|
|
|
|
|
|
|
|||||
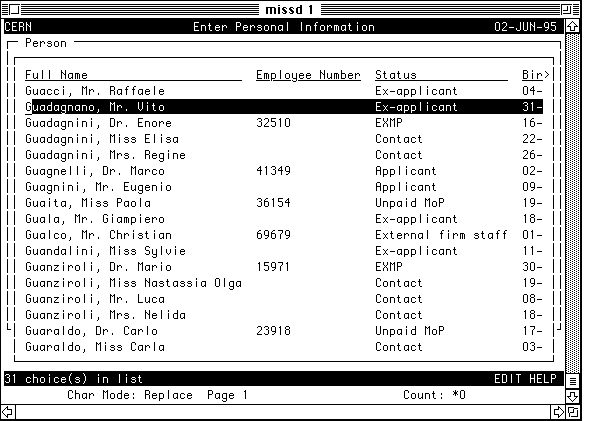
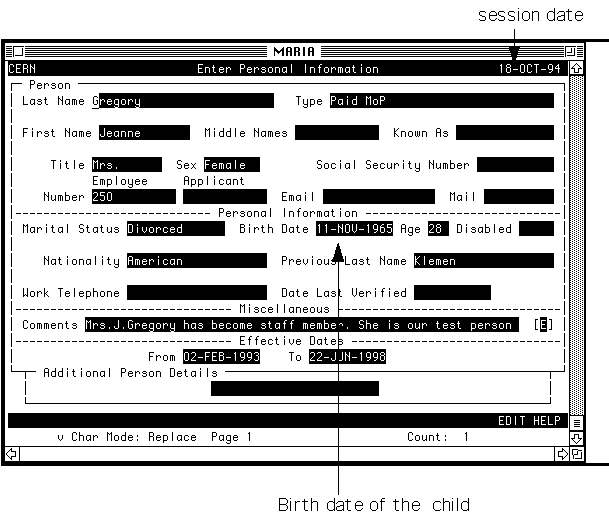
3. Reference guide to HR screens for Personnel Administration3.1. Personal Information\NPI Navigate Personal Information Identification Enter Personal Information All basic personal details as well as addresses and birth-related data are entered in this screen. A PICK list is available from the last name field, in order to avoid double entry of a same person. In this screen press F7 on the last name field and enter the name you are searching for then press return; a list corresponding to the name you have entered will appear. This list contains all persons identified as past, current, future employees and contacts and for applicants. You can search in this list by first name, date of birth etc.... by entering a %first name% or %YYYY%. Checking for double entries
Enter Personal Information
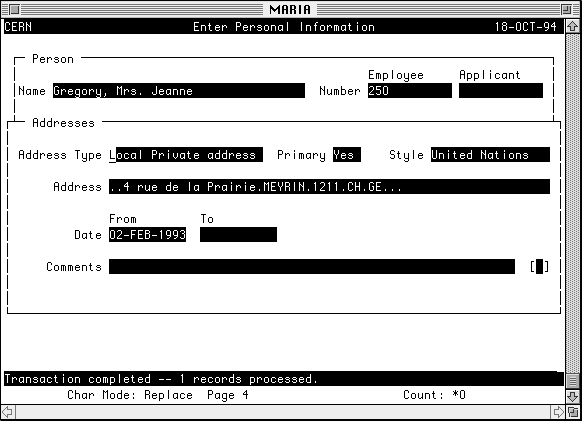
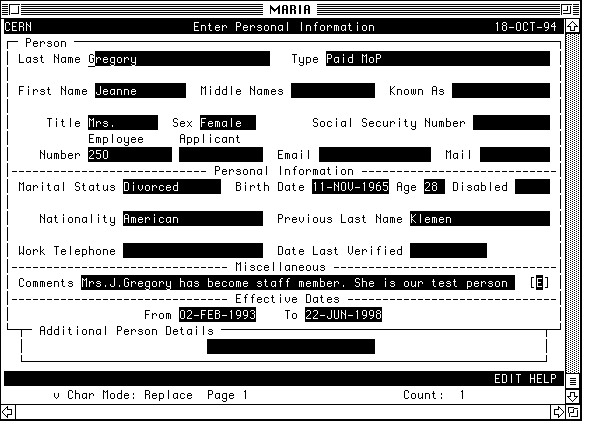
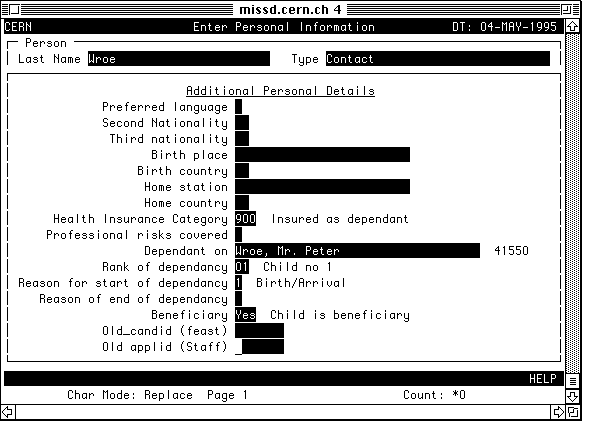
Person *Last Name, First Name, Middle Name, Known as, Title The combination of these five fields is the person's full name. This full name appears in the 'Search box', on the majority of the screens. *Type The type of person is an important concept within Oracle HR. The person types have been defined on top of system person types. There are three basic types of system types: External: The only information which may be recorded against a person of type 'external' is person information, addresses and special information. An external is not given an employee number and cannot have an assignment (employee's contract). External people registered into the system are mainly the dependents of the member of personnel or other simple contacts. Employee: An employee receives an employee number. It must have a period of service (assignment). In an implementation of ORACLE HR only one assignment is used. Any information may be recorded against an employee. Employees are first of all CERN Members of Personnel, but may also be staff from external firms, either CERN contractors or temporary manpower firms. Ex-employee: Ex-employees are persons who have been registered in Oracle HR as employee, and who don't have any current period of service. In addition to these three basic types comes the notion of applicant. An applicant is any person who has an active application to a post/position, or more generally, to any of the CERN recruitment programmes. The system types are any relevant combination of external/employee/ex-employee/applicant types. Examples of system person types are employee and applicant , ex-employee and applicant, external and applicant , etc. ... * The actions which may be taken for a person depend on the type the person has. For example, applications may only be entered for applicants and payroll may only be run for employees. * The concept of person types is used for security. Access to personal data may be restricted depending of person types. At CERN, security wise, we may distinguish between three types of persons: - Paid Member of Personnel, who receive a regular payment from CERN, either via the regular Payroll or via claims; only PE Division is entitled to enter/maintain most of the data related to this category of persons. - Unpaid Member of Personnel, which must be kept record of but who do not receive a salary from CERN; the Users Office enter/maintain data related to this category of person. - CERN visitors The consideration of personnel functions, plus security has led to the definition of the user defined person types, which are listed in the table below. List of person types User defined person type System person type Default Applicant Applicant Y Applicant and ex-applicant Applicant and ex-applicant Y Contact Other Y Contact + Applicant Applicant N EXMP Ex-employee Y EXMP + Applicant Ex-employee and applicant Y Ex-applicant Ex-applicant Y External External N External firm staff Employee N External firm staff + Employee and applicant N Applicant Paid MoP Employee N Paid MoP + Applicant Employee and applicant N RETR Ex-employee N RETR + Applicant Ex-employee and applicant N Unpaid MoP Employee N Unpaid MoP + Applicant Employee Y Visitor Employee N Visitor + Applicant Employee N For each defined person type , the system has a corresponding person type. * Title/Sex Choose from the picklist available * Social security number This fields holds the social security number which an individual usually receives from his home country. The only social security number which needs recording at CERN is the AVS number for Swiss nationals. * Employee number When a person becomes an employee, he receives an employee number, also referred to as CERN ident, which is automatically generated by Oracle HR and which will remain the same for all assignments which the person has at CERN. * Applicant number When a person becomes an applicant, he receives an applicant number, which is automatically generated by the system. This applicant number will be the same, for all applications, which the persons holds. If a person, who is currently an employee, is also an applicant, he has both an employee number AND an applicant number. * Email / Mail Personal Information * Marital Status (picklist) * Birth Date, The birth date is mandatory for any employee who needs to be on the Payroll. * Age The age, which is valid as of the session date, is displayed in this field. * Nationality (picklist) First nationality of the person. When several territories offer the same nationality, it appears in parenthesis. For example, the nationality of a guadeloupean, appears as French (GU). Enter the country name or do F7 and type the country code. * Previous Last Name Maiden Name. * Work Telephone Telephone of the person, at work, for persons other than CERN employees. It may also be used to record extra telephone numbers such as mobile phones for example. * Date Last Verified May be used to hold the date when the exactitude of the personal data has been last verified. Miscellaneous * Comments This field may be used to record any comments about the personal file. [ ] Additional Personal Details Contrary to the first part of the screen, which holds data commonly registered by firms, this Additional Personal Details field holds data which is CERN specific. * Preferred language (picklist) When a French version is available, this field will enable to display the screens/help messages etc. .. in the preferred language of the employee. It is also used for printing contracts or any official documents, using the preferred language of the employee. * Second nationality (picklist) This field holds the second nationality which a person may have. * Third nationality (picklist) This field holds the third nationality which a person may have. * Birth place * Birth country * Home station/ Home country * Health Insurance Category (picklist) * Professional risks covered The following fields define the relation of dependency of one employee with another employee: * Dependent on Displays the full name and employee number of the person on which the employee is dependent. Do F7 to enter the name. * Rank of dependency * Reason for starting / ending dependency * Beneficiary In the case of a dependent child, this field indicates whether the employee on which the child is dependent is entitled to the child allowance. A period of beneficiary must be included in a period of dependency. * Old Candid (feast) * Old Candid (staff) Additional Person Details From this point on, three zones may be accessed depending on the person type: Application, Period of service, Addresses. Application This zone is only displayed when the person is a current applicant. In this case, it displays the most recent current application. (see Recruitment) Period of service This zone is only displayed when the person is a current employee. In this case it displays the current assignment of the employee. The application and the period of service zone behave in the same way: - when a new employee is registered, you can move to the Period of service zone and enter information on the employee assignment. After you have saved this information, it is no longer possible to make any update on the employee's assignment from this transaction. Any further updates must be made using the \NECoA screen (refer to Assignment chapter). - when a new applicant is registered, you can move to Application zone and enter information on the application. After you have saved this information, it is no longer possible to make any update on the applicant's application, from this transaction. Any further updates must be made using \NAA screen (refer to Recruitment chapter). Addresses Addresses of three types may be kept for a person: - a private local address, - a private non-local address, - a professional address. Addresses are entered with start and end validity dates. In order to allow the recording of any address world-wide, the standard format proposed by the UN has been implemented. Only locations and country are mandatory, however, it is recommended that as many details as possible are given. Amongst all addresses recorded for a person, one must be chosen as the primary address. It should be the address where the person has the best chances to be contacted. WARNING: whenever you change the 'Last name' of a person you must always indicate it as an update even if it is a correction. Each update modifies also the information contained in the 'Previous Last name'. Hence, the information entered in this field must be deleted (if the change of name is not due to a marriage), then save it as a correction. Local Private address
This screen is divided into two zones: Person * Name * Number identification number of the employee. Addresses * Address Type choose from the picklist * Primary choose from the picklist * Address * Date :from... to * Comments 3.2 ContactsContact Identification Relationship Dependents Emergency
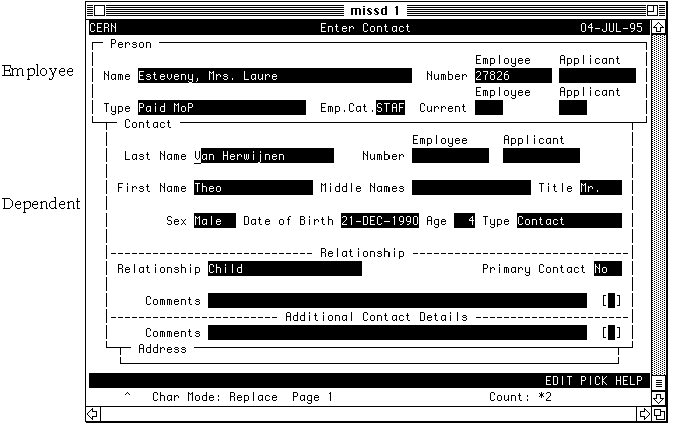
\NPCI Navigate Person Contact Information This screen is used to register dependents , contact persons of an employee and persons to contact in case of emergency. You may have to register persons in relationship with a CERN employee. These persons are: - the employee 's family members and other dependents. Dependents may be CERN employees themselves. - extra persons who the employee wants CERN to contact in case of emergency. In Oracle HR, these persons are referred to as contacts. The amount of information which is to be recorded on these contacts may vary. The main information is Last name + First name + Address. This is the case for the persons who need to be contacted in case of emergency. The maximum information is required for dependents: - Last name + First name + sex - Nationalities + date of birth + health insurance category etc.. - Additional information The first section of this chapter explains how to register a dependent of a CERN employee and the second section explains how to register a simple contact for an employee. Section 1 : Registration of a dependent Take the following step to identify a new dependent (who has never been identified in HR before). Change the session date to the date when the relationship starts (birth date for a child, wedding date for a spouse). NB: A married employee starting at CERN, enter dependents at today's date as external in case the employee's date contract would be advanced. Then, at the session date enter them as contact. Always make sure that the employee does not have a future planned contract before entering him/her as external. Identify a dependent (I)
To enter the person's personal information the following fields are necessary: * Last name, First name * Person type Contact * Sex * Birth date *Nationality [] Additional Personal Details * Health insurance category Choose from the picklist * Dependent on Which is the name of the employee which the contact is dependent on. To search for the employee's name you must do F7(picklist), enter the name and then do return. * Rank of dependency Choose from the picklist * Reason for starting , Reason for ending dependency Choose from the picklist * Beneficiary To indicate, in the case of a child, whether or not the CERN employee receives the child allowance. Choose from the picklist. Identify a dependent (II)
Check all information and SAVE the information which you have entered. \NPCR Navigate Person Contact Relationships This screen is used to enter and display the relationship between the CERN employee and the dependent whom you have just entered using \NPCI.
The screen is divided into three zones: Person This zone is a search box where you can find the employee by entering the name or the identification number. Contact The steps which you must take to enter the relationship between an employee and the dependent are the following: 1 . Retrieve the employee's file as explained in Basic Concepts, by using
the search box.
. Move to the second zone on the screen (zone contact). Oracle HR will
2 automatically display all persons which have been entered in relation
with the employee.
. Insert a new record with ROW INSERT(\RI) and press the PICK key on the
3 last name field for the contact person.
. Enter the first few characters of the person last name (or the full last
4 name if known). You will get a list of all persons registered in the
system which match these criteria. The presence of an employee number or
an applicant number will indicate that they are current employees or
applicants see Personal Information Chapter.
. If you cannot find the person which you want, then stop here, clear the
5 zone by pressing CLEAR ZONE and register the person using \NPI or \NPCI.
. If the person which you want is in the list, select it by pressing ENTER
6 and the system will automatically display all the personal information
about this person. If you realize that this is the wrong person, clear
the zone using CLEAR ZONE and go back to step 3.
. When you are sure that this is the right person to put in relation with
7 the employee, you may then tab into the relationship field. With the
picklist enter the relationship between the CERN employee and the
dependent.
Enter Simple Contact
8 . Some additional information is required about a relationship:
* Primary contact Amongst all the persons which are entered in relation with an employee, one person is declared as primary. The primary contact is defined as the first person to contact in case of emergency. 'Additional Contact Relationship Details' window Depending on the type of relationship, you will display the following information: * Date of death (date when the contact died) Only if the type is child (deceased) and ex-spouse (deceased) * Date of marriage * End date of marriage * Second date of marriage 9 . SAVE the information which you have entered.
Section 2 : Registration of a simple contact person (not a dependent) There is no need to register the person first using \NPCI, you may directly use the \NPCR screen and follow the steps: . Retrieve the employee's file as explained in Basic Concepts.
1
. Move to the second zone on the screen (zone contact). Oracle HR will
2 automatically display all persons which have been entered in relation with
the employee.
. Insert a new record with INSERT ROW (\RI) and enter basic information
3 about the contact (last name + first name).
. Enter the relationship which this contact has with CERN employee. Enter
4 Yes in the primary field if this person is the primary contact for this
employee.
. SAVE the information you have entered so far.
5
. Move to the Address zone (NEXT ZONE) and enter the address and telephone
6 of this new contact.
. SAVE the address information which you have just entered. Note that, in
7 this case, the contact will be known as of the first date when the employee
is known.
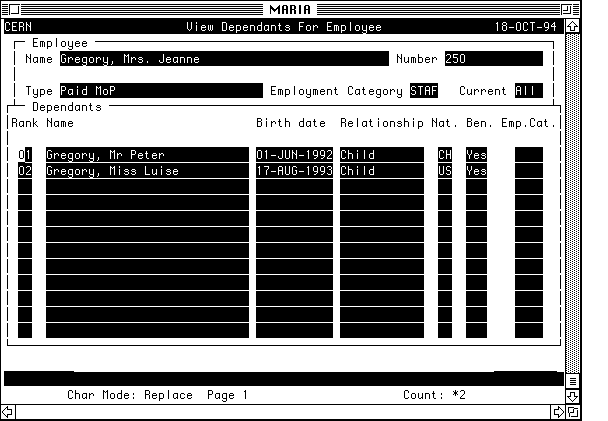
Section 3: List all dependents \NPCD List the dependents of an employee This screen is a query only screen and displays the dependents of an employee as of the session date then for each dependent you see displayed the * Rank of dependency, * Full name, * Birth date, * Type of relationship * Nationality * Beneficiary Indication that a child allowance is perceived * Employment Category The dependent is himself a CERN employee View dependents of an employee
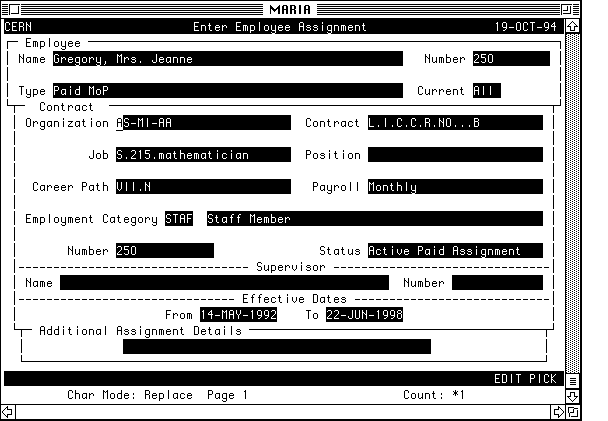
In most cases you will be interested in the current dependents of an employee. However, to see all dependents at a past or future date, you may change the session date to any point in time, and view all dependents of the employee at this new session date. If you place the cursor on a dependent, the sticky cursor will work when changing screen. This means that the next screen you will navigate to will contain information on the selected dependent. 3.3 AssignmentsEmployee Contract Assignment IntAddress Gradestep Costing Secondment \NEA Navigate Employee Assignment This screen is used to enter/maintain assignment information for an employee. Employee Assignment
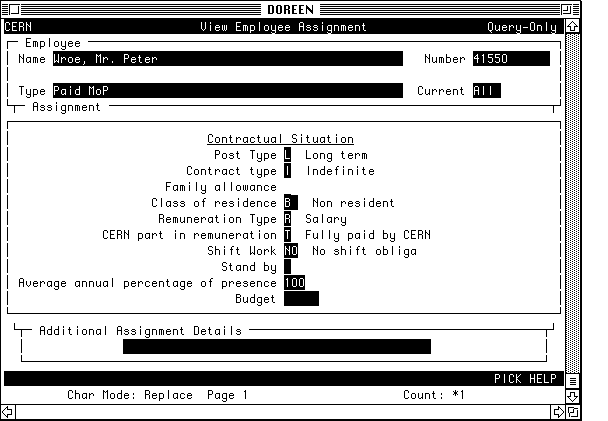
The components of the assignment are: Contract * Organization This fields holds the Hierarchical Internal Organization Unit (Division/Group/Sector) to which the employee is assigned. An employee may only be assigned to an organization which has been previously defined by the Responsible Services using the \NSOD screen , and which is valid at the session date. The assignment of an employee to an organization may be as precise (Division + Group + section + sub-section) or as vague as desired (CERN). When an employee is created, it is assigned by default as the highest node in the hierarchy of internal organizational unit, CERN. * Contract When you tab into this field, you open a flexible window which presents elements of the person's contract. Enter Employee Assignment (I)
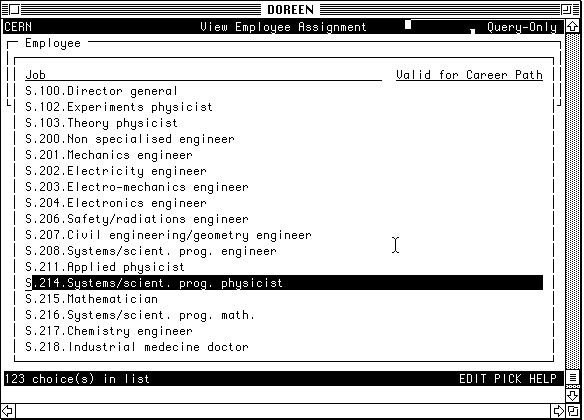
These elements are: * Post type * Contract type * Family allowance This field indicates whether the employee receives the family allowance. * Class of residence * Remuneration type This field indicates how the person is remunerated, .i.e. whether he receives a salary, a subsistence or whether he receives a lump sum or issues claims for payment. * CERN part in remuneration * Shift work This field indicates that the person may potentially do shift work. * Stand by This indicates that the person may potentially work in standby. * Average annual percentage of presence Presence at CERN may vary from 0% to 100% . * Budget Used for fellow and associate and indicates on which budget you are paid. * Job This field holds the professional code. An employee may only be assigned to jobs which have been created by PE Division using \NSJ and which are valid at the session date. The field is not scrollable, however, to view the entire text string which holds the job information, you may use \FE. The information is the professional code of the employee, the S code stands for MoP and a short description to help in the choice of the code.
* Career path This fields holds the career path and the advancement zone for an employee. Career path and advancement zone , which are valid at the session date, have been previously defined by PE using \NSC screen. * Position Not used for assignments. * Payroll To be paid via the CERN monthly Payroll, an employee must be assigned to it in this field. * Employment category The employment category is the 'CERN status', which determines the status of a person at CERN, information which CERN must record about him and the actions that need to be taken about a person. * Number (Assignment number) Oracle HR allows an employee to hold only one assignment declared as the primary assignment. The assignment number identifies the assignment. It is composed of the employee number xxxxx and a sequential number for the assignment, in the form xxxxx-n. NB: At CERN, for the moment, only one assignment is kept for each employee. If someone was Staff then became EXMP then UPSA, he will get for the UPSA status an assignment-2 but will keep his employee number. * Status (Assignment status) This field reflects the status of the assignment. Each user defined status is assigned a combination of a personnel status and a payroll status. The personnel status reflects whether the assignment is active or not (the employee is at CERN or not), and the payroll status reflects whether the employee should be processed by the Payroll or not. List of assignment statuses User defined assignment status Personnel status Payroll status Default
Active Paid Assignment Active assignment Process Y
Active Unpaid Assignment Active assignment Do not
process
Paid Special Leave Suspend assignment Process
Early Retirement Suspend assignment Process
Unpaid Special Leave Suspend assignment Do not
process
Final Termination Terminate assignment Do not
process
Arrival NOT YET CONFIRMED Suspend assignment Do not
process
Terminate assignment Terminate assignment Process Y
Suspend assignment Suspend assignment Do not process Y
End End Do not process Y
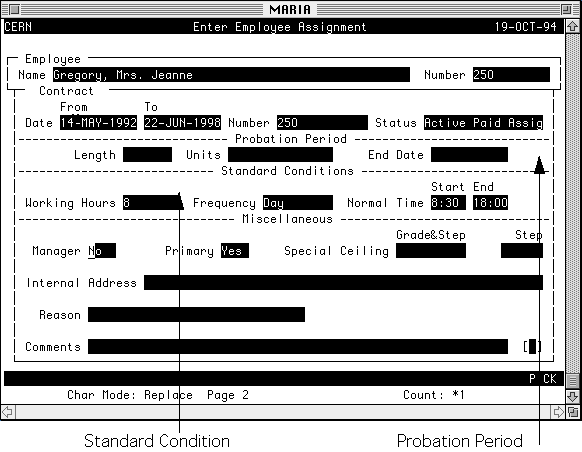
Additional Assignment Information When you tab into this zone, you have the possibility to access a number of zones: Probation Period Standard conditions (normal hours) Miscellaneous Contains very important information for Staff. Costing Budget values Secondary assignment statuses Choosing one of the first three zones will simply place the cursor on page two of this screen, where the user may modify the following information: .Probation period Enter here the probation length and unit (usually months). The application will automatically display the date when the probation period ends. .Standard conditions Enter here the number of hours worked per week by the employee. Enter Employee Assignment (II)
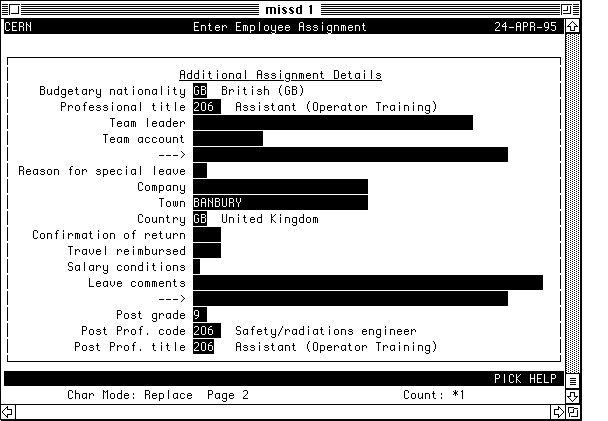
. Miscellaneous When you tab into the flex field indicator [ ], you open a flexfield window which displays the Additional Assignment Details.. Additional Assignment Details * Budgetary nationality In addition to a first and second nationality, a third nationality is kept for each employee, for statistic purposes. * Professional Title * Post Professional Code, Post Grade and Post Professional Title The employee has a professional code (such as physicist, engineer), a grade (career path) and a professional title. * Team Leader Displays the full name and employee number of the team leader for a person. * Team Account Displays the code and description of the team account for the experiments participants. Team leader and Team accounts are checked against information created in the ORIAC application and EDHAdmin application. * Reason for special leave * Company * Town, Country * Confirmation of return * Travel reimbursed * Salary conditions * Leave comments Additional Assignment Details
Costing When you tab in this zone, you open a window which displays the CERN costing structure for employee assignment. * Proportion A percentage from <= 100% > 0%. At one point in time the sum of all percentage must be a 100%. * Cost code Tabbing into this field will allow to enter three segments of information: * Intersection PPA This is the intersection to which personnel expenses related to the employee will be costed. It is validated against a list of intersections held in ORIAC (financial data base). Several intersections are given, they must all be in the same division. * Recharging centre These are codes identifying the third party to which personnel costs related to the employee will be recharged. * Recharging type Indicates whether personnel expenses related to this employee are recharged to using the standard cost or the real cost. To update the intersection PPA, just change the session date to the start date of the new PPA affectation. There can be three cases: - to change the existing PPA but keeping the same percentage: place yourself at the correct start date with F12 and modify the field PPA. - to change the existing percentage into different percentages , for ex: 100% into 50%, 20%, and 30%, place yourself at the right start date with F12 change the percentage and the PPA. Save with F3 after entering all the lines. - to change the existing lines of percentage into less lines, for ex: 50%, 20%, 30% into 50% and 50%, place yourself at the right start date with F12 change the two first lines and do F3. Change the date to the effective end date (start date -1 day) , position the cursor on the third line and do \RD. Answer 'YES' to 'do you really want to delete this record?' and choose the option 'End Date' to put an end date to this line. Costing Information for an employee
The secondary assignment statuses and budget values zones are not used in this current implementation of Oracle HR. \NECoI Navigate Employee Contract Internal Address
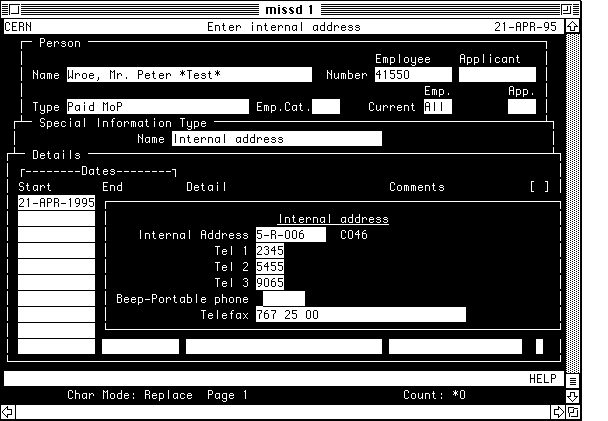
Only employees and ex-employees can have an internal address. A person can only have one internal address at a time. Therefore is it important to put an end date to a terminated address before entering a new one. The field Internal Address is linked to GESLOC (data base for management of space) which gives an automatic control whether the address exists or not. If the office number is not known, then it is possible to search all the offices in a certain building using the PICK. The postal address comes automatically when the internal address is entered. An employee can have up to three phone numbers plus a beep number. The telefax number must be entered with blanks between the digits otherwise the system will automatically add zeros in front of the number (for example 767 25 00 instead of 7672500). \NECoG Grade and Step
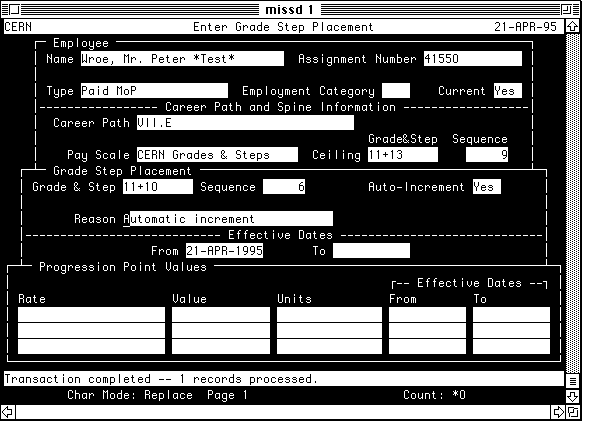
The grade and step placement screen is date tracked and it is therefore very important to change the date to the actual action date. To be able to enter a grade and step placement, the employee must have a career path defined in \NECA. The first zone holds information on the employee and his/her career path. Within this particular career path there is a ceiling define. The notation used for the career path is the following: - .E: exceptional auto-increment - .ES: exceptional step (only for career path IV) - .N: normal auto-increment - .M: merited increment - ASSO.: for Paid Associates - FELL.: for Fellows - GPRO.: for Guest Professor The second zone manage the grade and step, e.g. 5+2 or 13+4. The sequence is given automatically and indicates on which step in the career path the employee is. In the field Reason you can indicate the reason why an exceptional step increment or decrease has been applied. The third zone shows the corresponding salary to the grade and step. \NECoS - Navigate employee Contract Secondment
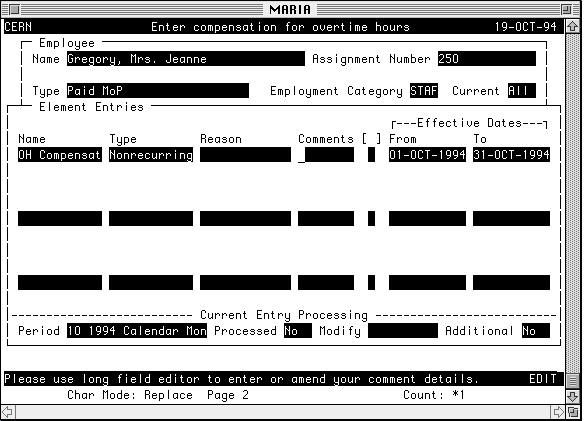
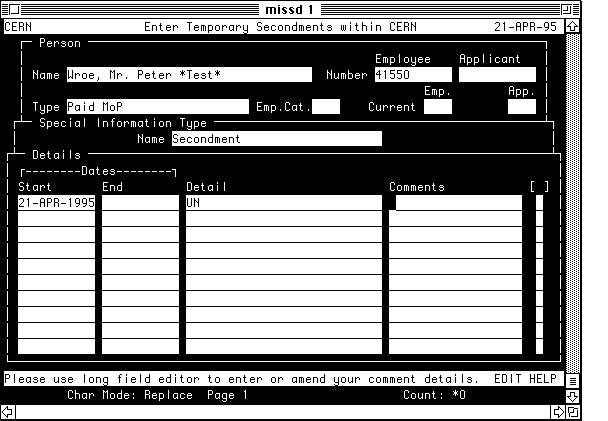
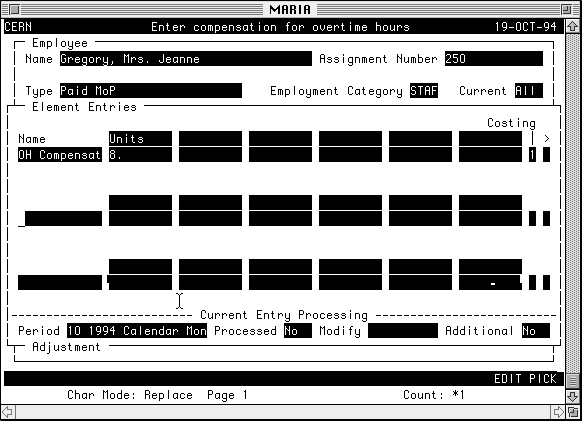
This special information type is used to manage information on an employee's secondment to another internal organizational unit. To be able to keep the history of secondments, it is necessary to enter a new record for each event with a begin and end date. This screen is not datetracked. 3.4 Elements of pay, entitlements, insurance, external allowancesEmployee Pay Overtime InOut Claims Bank Subsistence AVS Staff Assoc. Deductions Insurances Merit Awards Advances Loans Special All. This screen is used to register any elements related to statutory payments, deductions and entitlements connected with an employee throughout the contract period. The different categories of elements are: Pay: Elements connected to payments like bank account, subsistence allowance, AVS, Staff Association, deductions due to external sources, insurances (except health insurance), loans, awards, advances, special personal allowances. InOut: Arrival and departure entitlements (travel, removal, education), reinstallation. Overtime: Compensation for any type of overtime hours. Claims: Home leave entitlements and schooling information of dependent children. This information is used by the AVCL application. Elements are divided into two types: - Recurrent element These are elements which are attributed during a period of time between D1 and D2, for example, the reinstallation element covers the two years period after the employee departure. - Non-recurrent element These are elements which are attributed for a single payroll period. At CERN, payroll periods coincide with calendar months. An example of a non- recurrent element is the payment of overtime hours. The screens for entry elements are divided into two zones: Employee * Name Position on the employee file. Press NEXT ZONE (\ZN, or Page Down). Element Entries * Name Choose from the picklist the element name. The description, the type of element (recurring/non-recurring), the classification of the element (personnel information) are displayed. Enter element for an employee (I)
In the following fields relevant details of the chosen elements are displayed and, depending on the element, further details may be registered. * Costing This field is only displayed for some elements, e.g. overtime payments. It allows to bypass the employee costing information and to give a specific intersection for the payment of overtime hours. Otherwise, when you tab into the following empty field, you will be asked "Do you wish to see more details?' If yes, you will get a new screen Enter element for an employee (II)
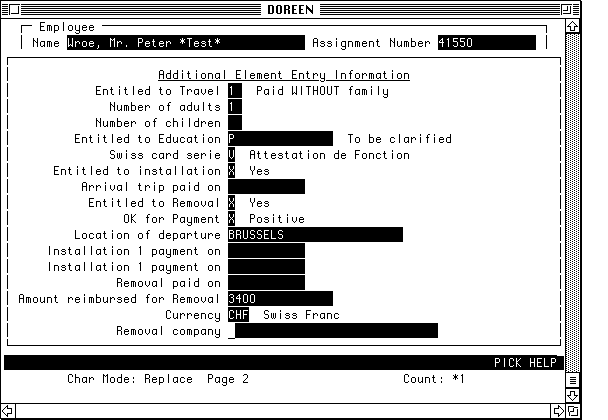
Element Entries * Name , Type Automatically displayed. * Reason In certain cases information can be entered. * Comments You may enter any comments in this field, as explained in the Basic Concepts chapter. [] Additional Element Entry Information Depending on the element name, you will open within a flexfield window other windows for additional information. Descriptive flexfield zone of 'Arrival Entitlements'
Descriptive flexfield zone for 'Departure'
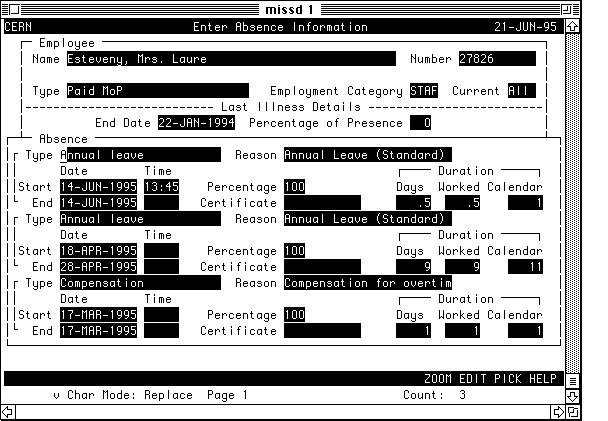
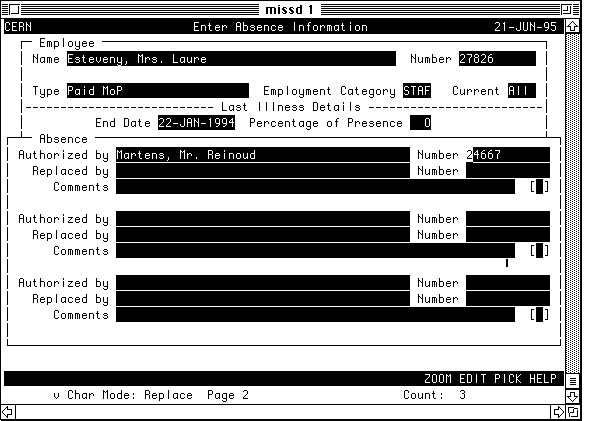
* Effective Dates The date or time period for which the element is valid. By default, this is the session date or the current month. The screen for entering elements of an employee is a datetracked screen. You may not change the start and end effective dates directly but you have to change the session date as described in the Basic Concepts chapter. 3.5 AbsencesAbsences \NEAL Enter Absence Information This screen is used to enter all types of leave (annual, professional and non-professional sick leave, special leave, training, etc.,) as well as type-related reasons for the leave. The annual, professional and non-professional sick leave, special and professional leave are calculated taking into account weekends and official holidays. Annual leave is calculated in days and deducted from the person's leave entitlement, special and professional leave is calculated in days, but not deducted and sick leave is calculated in days and calendar days, weekends and official holidays included, if appropriate. Enter Absence Information
The screen is divided into the following two zones: Employee This zone is a search box where you find the person by entering the name or the identification number. Last Illness Details * End Date/Percentage of Presence These fields show the end date of the last illness and the percentage of presence. Absence This zone allows to enter three leave periods at a time and more if you just do \RI (Row insert) as well as the authorization and replacement information. It is possible to correct dates by overwriting them, but it is not possible to change the leave type. In the case of a change of leave type, the record has to be deleted by positioning the cursor on the record, and by doing \RD (ROW DELETE). To enter a new leave period, do \RI (ROW INSERT) to get an empty record. * Type (Picklist) From this list choose the absence type. To enter the days of Home leave choose Type: Annual leave Reason: Home leave To enter the Travelling time choose Type: Home leave (not deducted from the annual entitlement) Reason: Trip to home station * Reason (Picklist) Specific type-related reasons for the absence. * Start/End Dates The dates of the leave. A start date and an end date must be entered. * Start/End Time In the case of half days, the time must be entered in the following way: - up to 13:15 (hh:mm) for the morning - starting from 13:45 (hh:mm) for the afternoon. * Percentage Percentage of the absence, default is 100%. This field has to be entered. * Certificate For illness or special leave, the date of the certificate is entered. In the case when the date of the certificate is outside the dates of illness the message : Warning: Certificate begins after start of illness. will appear. Reply NO and the message will be ignored. Press F3 to SAVE the data. In the case of overlapping dates, the message : This absence overlaps another absence for this employee, continue? will appear on the screen. Previous leave dates will have to be checked. Once the information is saved, the result of the calculation of the leave is shown in the following fields: Duration * Days The calculation gives the days to be deducted from the annual leave entitlement. * Worked The calculation shows the number of worked days. This field displays the number of worked days included in the leave. * Calendar The total of the calculation includes weekends and official holidays. For long sick leave without an end date, the calendar days at the session date are calculated and shown. This field displays the number of civil days (worked days + weekends + official holidays) included in the leave. If you tab into the right of this zone the following screen appears:
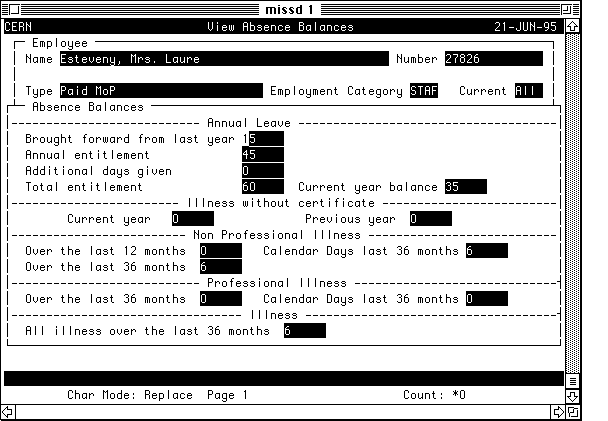
Absence * Authorize by/Number (Picklist) The name and identification number of the person who authorized the absence can be entered. * Replaced by/Number (Picklist) The name and identification number of the person who replaces the person during the specific leave period can be entered. * Comments Any useful comments concerning this specific leave record. Enter here old certificates dates in the case of several ones. \NEAB Navigate Employee Absence Balance This screen allows to view the current annual leave balance as well as the situation of illness without certificate, professional and non-professional illness over various periods.
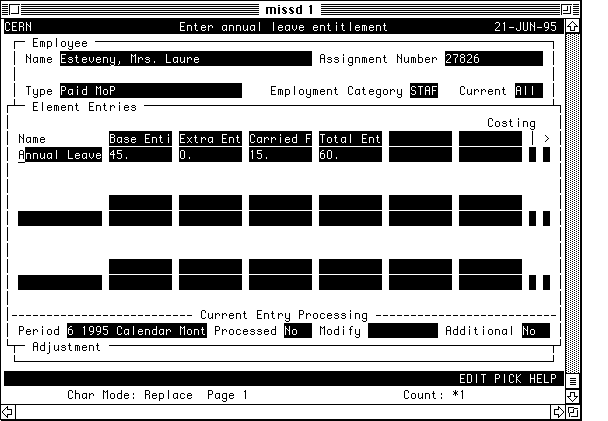
The screen is divided into two zones: Employee This zone is a search box where you can find the person by entering the name or the identification number. Absence Balances This zone shows the balances of the various categories of leave: * Annual leave The different entitlements as well as the current year balance are shown. * Illness without certificate The totals of the current year and the previous year. * Non Professional Illness The totals in days over the last 12 and 36 months as well as the total over the last 36 months in calendar days. * Professional Illness The totals in days and calendar days over the last 36 months. * Illness All illness in days over the last 36 months. \NEAE Navigate Employee Absence Entitlement This screen is used to enter a person's annual leave entitlement.
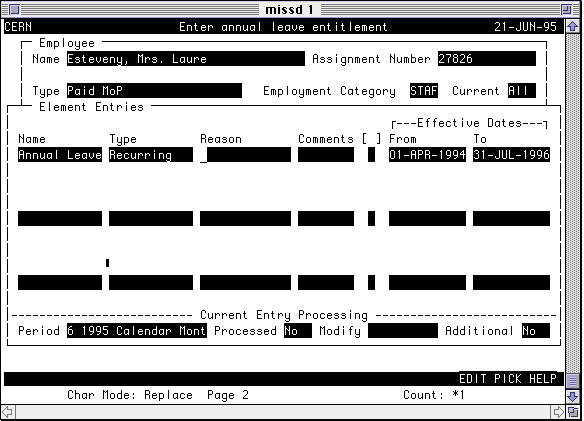
The screen is divided into three zones: Employee This zone is a search box where you can find the person by entering the name or the identification number. Element Entries This zone consists of the following fields: * Name (Picklist) The only element name available is 'Annual leave', it is shown automatically. * Base Entitlement The entitlement of the actual leave period, 1 October to 31 September of the following year. The data will be transferred automatically. * Extra Entitlement Any extra entitlement, e.g. 5 days for long service. * Carried Forward Days carried forward from the previous leave period. * Total Entitlement The total entitlement for the actual leave period. By moving the cursor to the next fields, the window Do you wish to see more? YES NO opens. If you chose YES the following screen appears: Entitlement screen
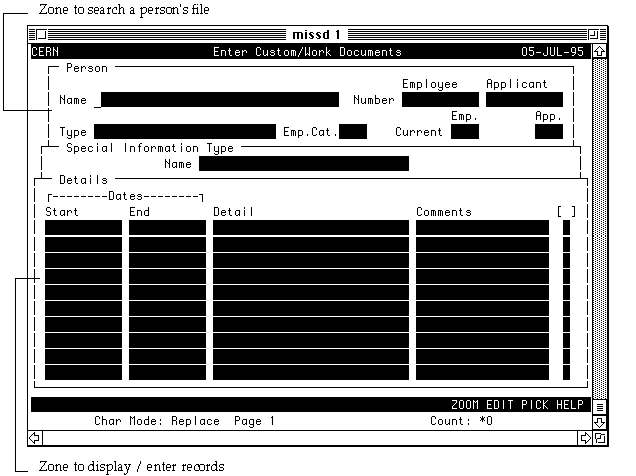
Element Entries This zone shows the following information: * Name Annual Leave * Type Recurring element * Reason * Comments Any useful comments on the leave period (special leave, part-time, etc.,) can be entered. * Effective Dates From/To Dates of the actual leave period 3.6 Special InformationMost of the information kept in Oracle HR is linked to an entity such as a person, a contract, an element of pay, an absence etc. Any information which falls outside these main entities, which is CERN specific, which is dated (and NOT datetracked) and which does not trigger a payment is stored into a special information type. Examples of special information types are: - access authorizations to CERN restricted access areas, - documents delivered to persons as required by the Host States Authorities, - skills or qualifications held by a person. The structure of each special information type does not come standard with Oracle HR but have been designed to match closely the CERN requirements. A special information may relate to any type of person, as defined in Basic Concepts: - to an applicant, such as the references which an applicant produces for recruitment, - to a dependent of a staff member, such as the Swiss card delivered to him by the Swiss authorities to this dependent, - entitlements to home leave . Each record of a special information type is dated with a Date From and Date To. The signification of these dates may differ with the type of special information: - For an Access Authorization, they are the dates between which the access authorization is valid. - For an External Employment, the dates represent the period of affiliation to an institute. The most recent record of information, usually representing the current situation, is presented at the top of the list. So far several special information types have been implemented: - Access authorization - Bank loans - CD plates - Custom work documents - Discipline and activity - Emergency contacts - Experiments participants - External employment - Forms received - Green plates - Home leave entitlements - Importation formalities - Indefinite appointments - Internal address - Languages - Other insurances - Professional experience - Publications - Qualifications - Reference - Schooling - Secondment Although the structure of each special information type is different, the screen used to enter, update or retrieve information is the same for all special information types. This section describes first how to use a special information type screen in general and then concentrates on the structure of each information. 1) Data entry using a Special Information screen \NPSDA : Navigate Person Services Documents Alldocs Components of a Special Information Type screen
The screen is divided into three zones: Person: searching the person's file. Special Information type: choosing the type of special information. Details: displaying/entering records. To enter data, you must follow the steps: - Position on the person or the employee file as described in Basic Concepts. - Press NEXT ZONE (\ZN, or Page Down) and in the field * Name of the Special information Type zone the default choice appears. - The cursor will automatically move to the zone Details and will execute a query. If any record already exists for this employee and for this special information type, it will be displayed. Special Information Type - Periods of validity
* Date From By default, this date is set to the session date . You may change this date to any date you want. * Date To This date is null by default, you may change it to any date you want. * Detail: When you move to this field, you open a flexible window which presents the segments of the Special Information Type. You may fill in these fields. Special Information Type - Flexfield window
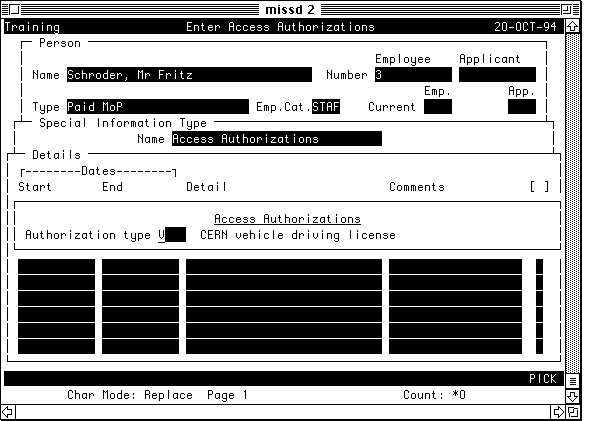
When you exit this flexible window, you will display a concatenated view of the information which you have entered. Comments You may enter any comments in this field, as explained in Basic Concepts. Hint: To facilitate data entry, you may copy the previous record of a Special InformationType by ROW INSERT (\RI) followed by a ROW COPY (\RC) and correct the validity dates and the information which changes from one period to the other. \NPSA Navigate Person Services Access This special information holds details of the access authorizations held by a person on the CERN restricted areas.
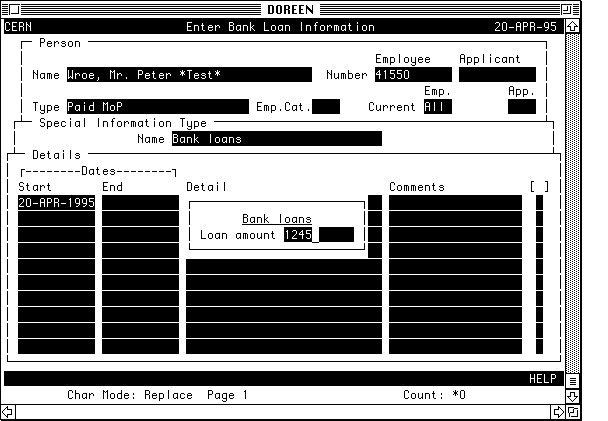
The different access authorizations are entered in the flexfield. \NEPL - Navigate Employee Pay Loans This special information holds the start date and end date of a person's private bank loan.
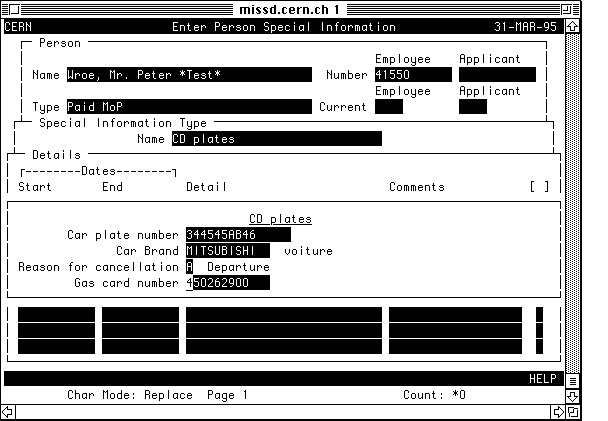
\NPSP - Navigate Person Services Plates (CD/ Green) This special information holds the period of validity for CD plates and related information. It enables to monitor the attribution of these plates and the renewal of related documents such as the gas card. Under the special information type option Green plates you'll find the same information without the gas card number. Entering information for CD plates
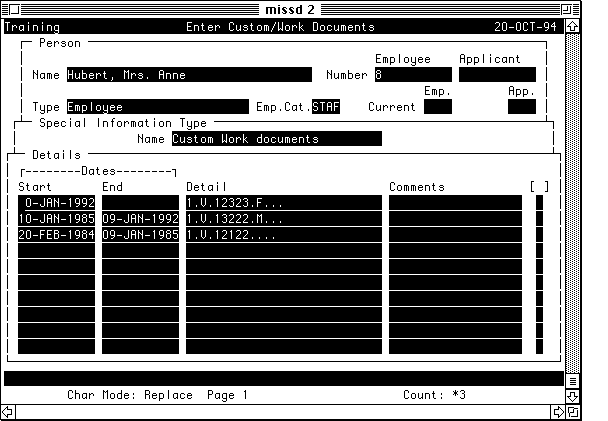
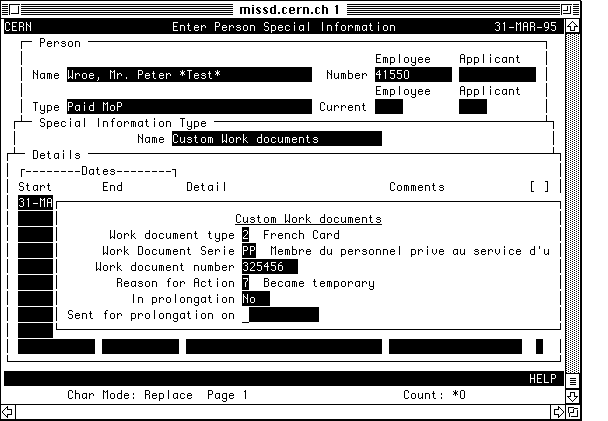
\NPSDA - Custom Work documents This special information enables to register the Swiss and French card which are given to Members of Personnel and their dependents. This allows the monitoring of the attribution and renewal of these documents. Various reports are extracted from this information and are communicated to the Host States Authorities on a regular basis. It also holds information on the function attestations, which are distributed to Associates, who are not entitled to the French or Swiss cards.
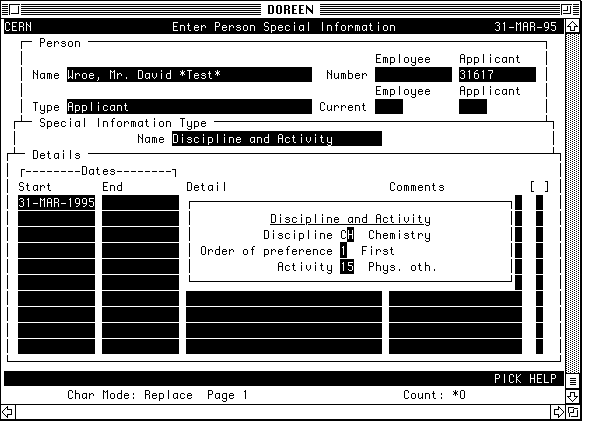
To flag a document that is being sent for prolongation, enter YES in the 'In prolongation' field and exit the field. The field 'sent for prolongation on' will be automatically filled with the current date. \NAD - Navigate Applicant Discipline and Activity This special information is mainly used in the context of the recruitment. It holds information on the preferred disciplines and activities of applicants. In the field Special Information Type there's a list with several different variables, amongst which Discipline and Activity is one of the options.
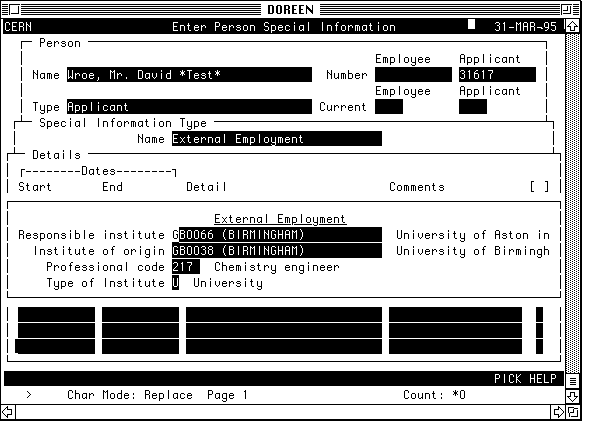
\NUA Navigate UOffice Affiliation (External Employment) This special information holds the periods of affiliation of persons to external institutes.
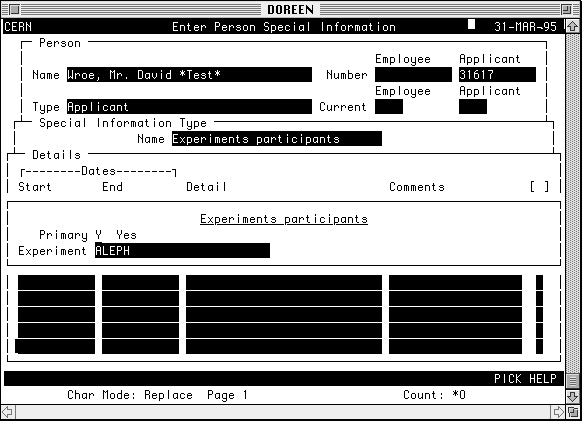
\NUE- Navigate UOffice Experiments This special information holds the experiments to which a person participates.
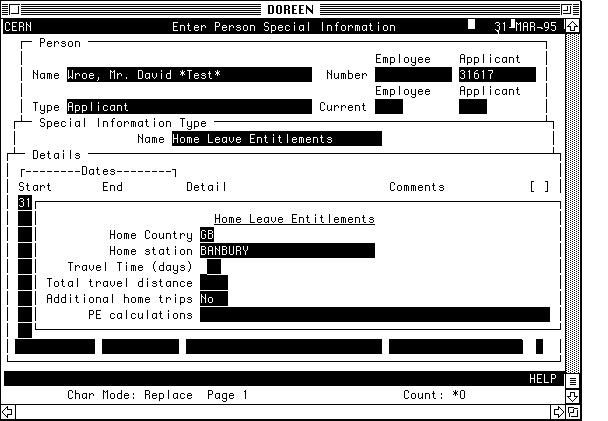
\NEClH - Navigate Employee Claim Home Leave This special information holds the periods of entitlement of home leave for Staff Members and Fellows. It is used by the AVCL application to check the validity of a request for a leave to a person's home station.
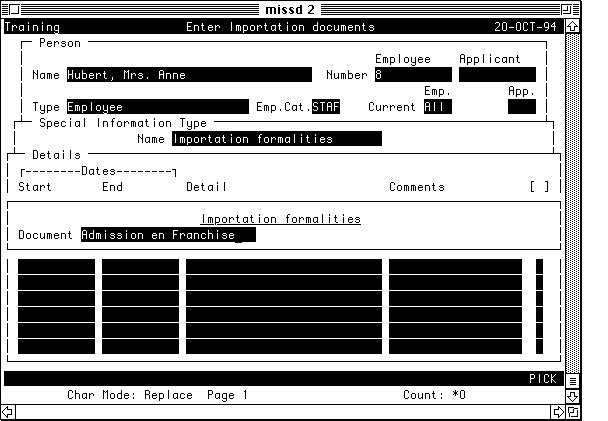
\NPSI - Navigate Person Importation formalities This special information allows to monitor the circulation of all documents related to the importation of goods, upon arrival or departure of a Member of Personnel.
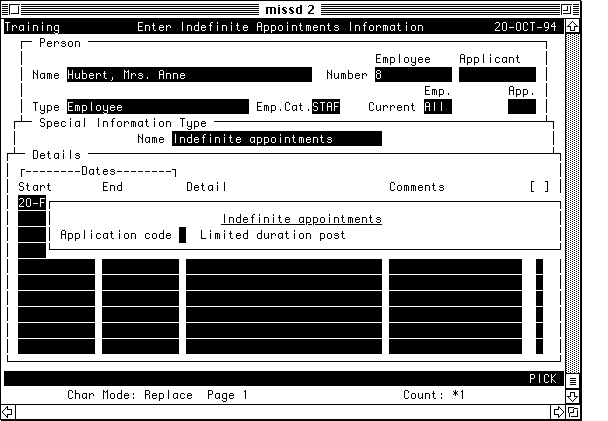
\NECoI - Navigate Employee Contract Indefinite Appointments This special information allows to monitor the attribution of indefinite appointments.
\NECoI - Navigate Employee Contract Internal Address This special information holds the details of the internal address of a person at CERN. Only employees and ex-employees can have an internal address. A person can only have one internal address at a time. Therefore is it important to put an end date to a terminated address before entering a new one. The field Internal Address is linked to GESLOC which gives an automatic control whether the address exists or not. If the office number is not known, then it is possible to search all the offices in a certain building using the PICK. The postal address comes automatically when the internal address is entered. An employee can have up to three phone numbers plus a beep number. The telefax number must be entered with blanks between the digits otherwise the system will automatically add zeros in front of the number (for example 767 25 00 instead of 7672500). Internal Address Information
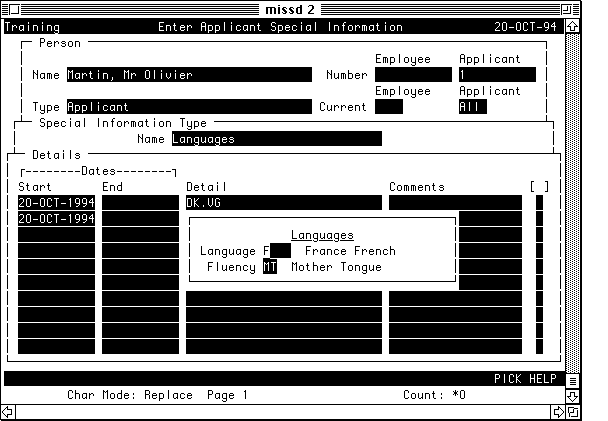
Please note that , the Postal Box, which is the attribute of an office and not of a person appears as the description of the office number. \NAD - Navigate Applicant Details (Languages) This special information holds the knowledge of languages which a person possesses and the degree of fluency. One record is kept per language since only the current situation is interesting. The start date will correspond to the date when the information is registered. An end date is not meaningful.
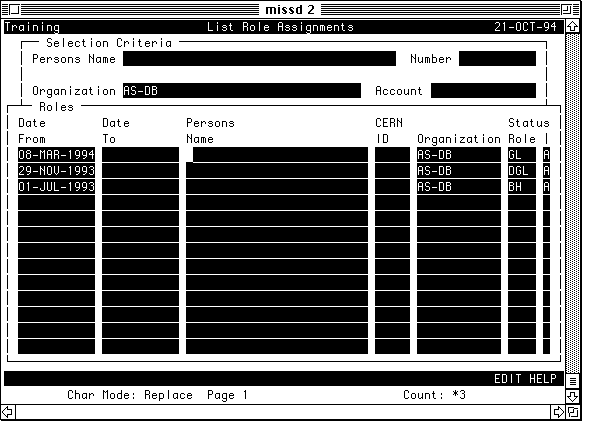
\NAD Navigate Applicant Details (Professional Experience) This special information is used mainly in the context of recruitment and holds the periods of previous employment of an applicant . \NAD Navigate Applicant Details (Publications) This special information is used in the context of recruitment and holds publications made by a person. \NAD Navigate Applicant Details (Qualifications) This special information holds the details of all diplomas and other qualifications held by a person. It is used mainly in the context of recruitment. \NAD Navigate Applicant Details (Reference) This special information holds all references presented by an applicant. It is used mainly in the context of recruitment. \NVLR - Navigate View List Roles (or Responsibilities) This special information lists all roles or responsibilities held by a CERN employee. A role may be managerial (group leader, division leader etc. ....) or a role of coordination (Divisional Administrative office, Divisional training officer etc. ...). The information on roles held by a person is entered and maintained using EDHAdmin application. This screen has been implemented to visualize role assignment information directly from Oracle HR.
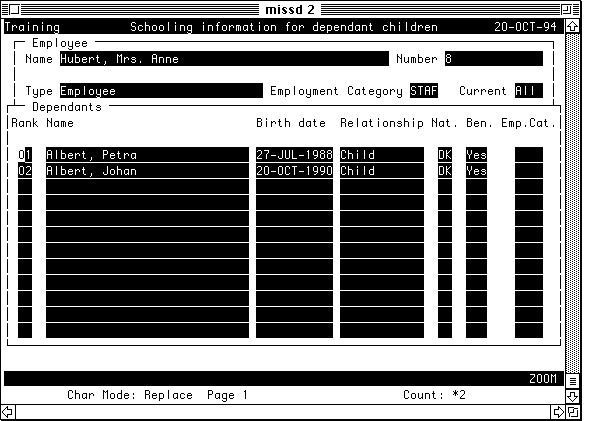
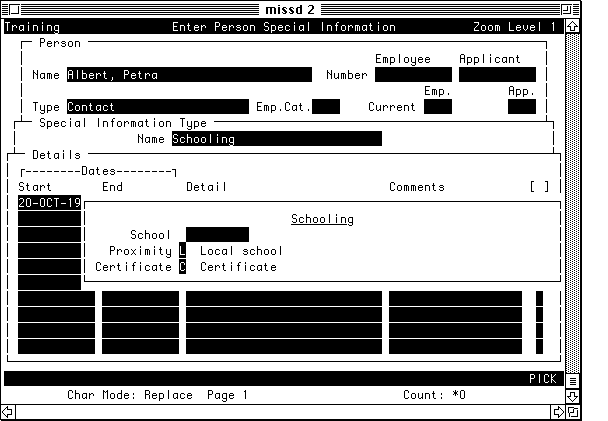
\NEClS - Navigate Employee Claim Schooling This special information screen holds the schooling details for a dependent of a Member of Personnel. This information is used for the reimbursement of the school fees expenses in the AVCL context. Place the cursor on the dependent and press the key 'Zoom' (\OZ).
A second screen is then posted on which the dependent's name appears in the first zone. Fill in the necessary information in zone three, valid with F3 and return to the previous screen with F4. The system will then ask you if you want to abandon zoom level 1 (yes/no). Reply ' Yes' to go back to the 'family screen' and choose another child if necessary. Schooling Information
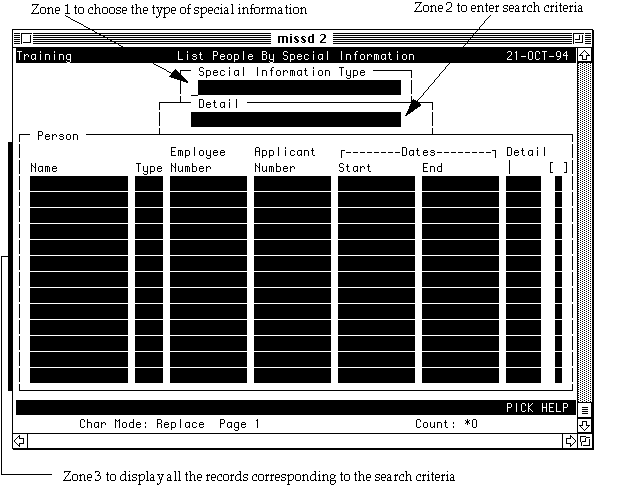
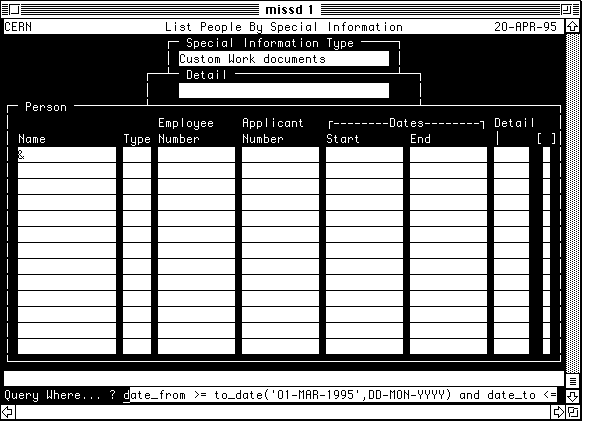
2) Retrieval of special information To find out all the records kept for a special information type for a person, use the same screen as explained above. To retrieve all persons which match certain criteria on special information type, proceed as follow: - Navigate to \NVLS to access the standard Oracle HR screen "List People by Special Information" This screen is divided into three zones:
* Special Information Type The special information type can be chosen from a picklist in this zone. Only the special information types to which you have access will be displayed. * Details Use NEXT ZONE to move to the next zone. This will display a flexible window to let you enter criteria of selections. Enter the criteria you want and press NEXT ZONE to access the last zone of the screen. * Person All records matching the selection criteria will be displayed in this zone, after you have pressed down EXECUTE QUERY, with the following fields: Name Full name of the person. Type Person type of the person . Employee number The CERN iden. of the person, if he is an employee. Applicant number Indicates that the person is an applicant. Start & end dates The period of validity of the information, for the person. Detail Moving to this field will open a flexible window containing the details of the special information type for this person. - To perform a limited enquiry in this zone, press ENTER QUERY, enter the selection criteria and press EXECUTE QUERY. - You may want to display only the records with a period of validity within two dates, D1 and D2. To do so, proceed as follows: - Press ENTER QUERY - Type & in the first field and press EXECUTE QUERY - Oracle HR will display a message line at the bottom of the screen Query where .....? - Enter: date_from >= to_date(D1, format) and date_to<= to_date(D2, format) and press ENTER to execute. The format must match the format of the date which you give. If D1 is entered as 31/10/94, the format must be 'DD/MM/YY'. If D1 is entered as 31-OCT-1994, the format must be 'DD-MON-YYYY' etc. Special information screen
|
|
|
Last modified on 07.12.2000 |
|