SMT Overview
What is SMT ?
SMT is essentially a discrete event simulation engine integrated into the ART reporting framework used for the HRT and CET applications. SMT stands for Staff Monitoring Tool and serves multiple purposes...
- It provides monitoring of the CERN staff complement in the short/medium term future.
- It provides man power planning facilities.
- It provides simulations (projections) of CERN staff and fellows (FTE and Costs) for the short/medium/long term future.
- It provides the possibility to evaluate "what-if" scenarios.
- It provides capabilities (for central services) to simulate future changes to CERN staff rules and regulations.
Who can use SMT ?
Access to SMT is automatically given to all holders of DPO and DDPO roles. Certain users also have special administrative rights to SMT. Access can be given to any user by a HRT Administrator. To request exceptional access the HRT Exceptional Access Request form must be used. Please do not send requests for HRT access to the IT help desk. The IT help desk do not have the rights to administer such access.
Where do I start ?
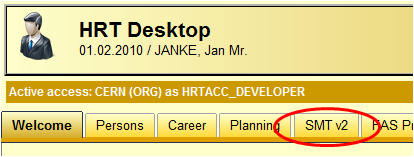
SMT is a component of HRT and can be reached from the HRT main menu by clicking on the SMT v2 menu item. This brings you to the SMT v2 sub menu (see below).
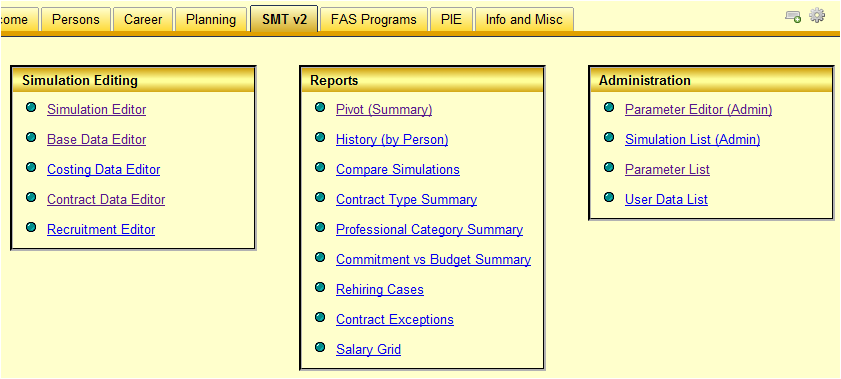
The SMT tab is shown below. As you can see it contains three main areas.
The box "Simulation Editing" contains different editors which allow you to list/create simulations and/or to modify simulation parameters and data. The "Reports" box contains links to various reports which are useful when analysing the results of a simulation. Finally the box "Administration" contains administrative tools for SMT administrators as well as two very useful lists:
- The Parameter List allows you listing all the parameters of a simulation or only those that have been changed compared to the default settings.
- The User Data List provides access to all the data (base, contract, costing or recruitment data) that has been manually adjusted for a given simulation.
Okay, and now, what do I do ?
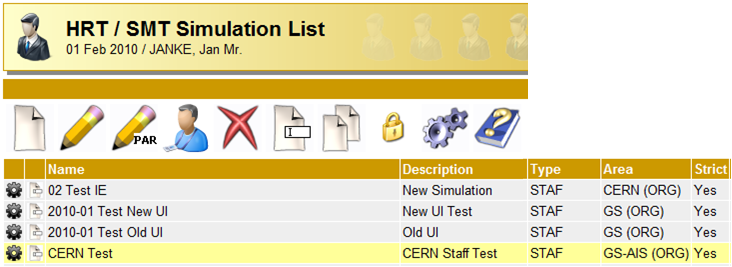
The first thing you would want to do is to create your first simulation. Creation, deletion and basic maintenance of simulations are done in the Simulation List/Editor. Clicking on this item will open a new window and bring you to a screen looking similar to the one below. Of course, the first time you open this screen apart from the system simulations, there will be no simulations listed unless a colleague has shared a simulation with you.
As in all the SMT editors, the Simulation List consists of several parts:
The header indicates which editor is opened (Simulation List, Parameter Editor, Access Editor or one of the Base/Contract/Costing/Recruitment Data editors).
Below the header follows a toolbar with several buttons giving quick access to key functions of the editor. The toolbar of the simulation list is explained further down.
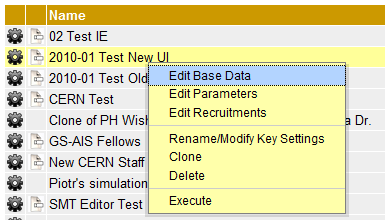
The largest part of the screen is occupied by the list of simulations (or other data items for the other editors). The currently selected item is shown in yellow, all other lines have a light grey background. Each item normally has a context menu attached to it. From the context menu, most functions that are also reachable via the toolbar can be called directly on an item. This is practical as it avoids you to scroll up if the lists get very long.
The Toolbar
The simulation list is primarily managed using the tool bar at the top of the screen. Below follows a brief explanation of the different icons.
Creates a new simulation. You will be asked to give a name and a description of the new simulation. Furthermore, you set the simulation type and area and specify whether strict simulation rules should apply or not. Opens the Base Data Editor. More information can be found on this page. Opens the Parameter Editor. More information can be found on this page. Opens the Recruitment Editor. More information can be found on this page. Deletes the currently selected simulation. Allows you to rename the simulation as well as changing the description, the simulation type, area and whether strict simulation rules are applied or not. Clones a simulation. All user entered data will be copied from the original to the clone. Opens the Access Editor. Executes the simulation. More information can be found on this page.
Selecting simulations
Most of the above icons are gray the first time you open the simulation list. In order to use them you will first have to select a simulation to work with. If you have not yet created a simulation you should of course create one by clicking on the New icon.
A simulation is selected by clicking on the Name or Description of the simulation. The selected simulation is displayed with a yellow background.
Once a simulation is selected the icons in the toolbar also become active. If some of the icons are still not active, you have probably selected a system simulation or a simulation a colleague has shared with you. In these cases, you cannot modify all simulation settings freely and the non-available functions remain greyed out.
Next...
You should now be able to create your first simulation. However, there are a few things you really need to know about simulations before you can use work efficiently with them so you should now proceed by reading the page about Basic Concepts.