2. Basic concepts
2.1 Connection to missd
- From a Macintosh
Go to the apple
Go to ' Chooser '
Choose ' Appleshare ' : Zone Ethernet: AS Server
Enter as Guest, then press OK.
In the list choose AIS Applications.
Open HR
Copy Telnet 2.6 and ' Oracle HR ' on to your disk
Open ' Oracle HR ' from your disk
You have a Unix window which opens. You can change the size and colour
of your screen under the option Session
Then go to the File menu and choose Save Set
Give it a name.
Put the original ' Oracle HR' into the trash.
To install the 'connection to HR' under the apple menu
(if you wish)
Click the folder Telnet 2.6
Go to File and choose Make Alias in order to make an alias
of your Connection to 'HR'
Open your disk
Go to System folder
Choose Apple Menu items
Drag your alias into the Apple menu items
Go under the apple and you will find your 'Connection to HR', ready to
be used.
- From a PC
Open the Group AS Division (if you do not have it go to More Groups and
install the AS Division)
Click on Oracle HR
Enter your UNIX username and password
Choose the option Human Resources
Enter directly into the ORACLE HR window
Enter your Oracle username and password.
2.2 Connection to Oracle HR as a HR user
When you click on the icon HR you will first have to enter your Missd username
and password which are case sensitive. Then the following window will appear:
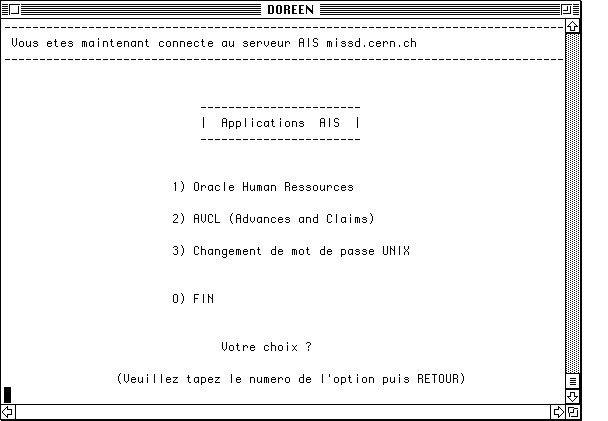
Choose 1 for Oracle Human Resources and Return.
Now appears the ORACLE HR.
All you need to do is enter your user account name and password. You
will have a pre-defined profile according to your needs.
For Macintosh only:
The first time you connect onto HR go to the EDIT menu
Choose preferences, terminals.
Then Click on the button 'Change'.
Remove the cross under 'Map Pg/Up' by clicking in the box.
Then press OK
This procedure will only be done once.
You are now ready to begin.
2.3 Choice of responsibility
In Oracle HR, access to data may be restricted at three different levels:
- access to individual screens is restricted via a menu
- access to employee records is restricted via a security profile
- access to reports and processes is restricted via a report security
group
Once your access rights have been identified (profile), they are granted
to you by means of a responsibility.
You may have more than one responsibility. If this is the case, you will
choose, when you connect to Oracle HR, the responsibility which you want
to work with. To change responsibility at any time, you may type \UsR,
without having to log on to the application again.
If you have only one responsibility, Oracle HR will automatically start
with this responsibility.
Responsibilities are granted by your Oracle HR administrator (in Personnel
Division).
You may use the ' Training responsibility' which gives full access to
the test database.
Changing responsibility
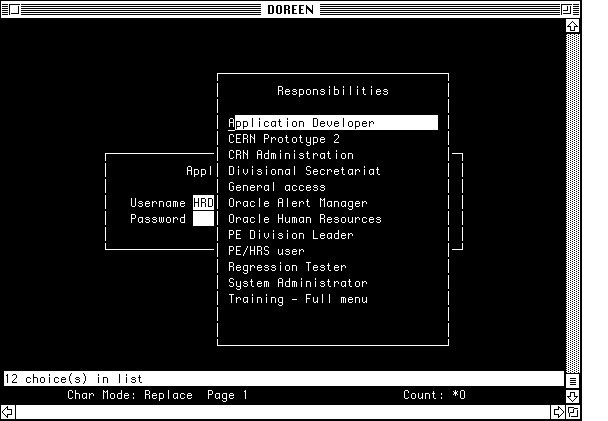
2.4 Changing profile
To start with, you can work with the environment which your System Administrator
has set up for you. Once you are familiar with the system you may want to
tune it. To do so, use \NOP and change the option.
Have a look to the additional guide "A
simple method to define a new responsibility" by F. Briard.
2.5 Menu navigation
You access any screen via the standard main menu. The transactions which
you are allowed to access will appear in the menu. Access to a transaction
is given to you either in Query mode, which means that you may only
retrieve the data but not modify it, or in Update mode, which means
that you are allowed to make changes to the information which you have retrieved
.
The full standard menu structure
Path Description
Person
Identificati \NPI Personal information
on
Contacts
Identification \NPCI Identification of
contacts
Relationships \NPCR Relationships between
two identified persons
Dependants \NPCD List all dependants of
an employee
Emergency \NPCE History of emergency
contacts (R/O)
Addresses \NPA Private and professional
addresses of a person.
Services
Access \NPSA Access authorizations to
CERN restricted access
areas.
Documents \NPSD Swiss, French, CERN
cards.
Alldocs \NPSDA Swiss, French and CERN
documents held by
persons.
Dependant \NPSDD Swiss, French documents
s for dependants.
Plates \NPSP Green & CD plates
Importation \NPSI Importation formalities
Delete \NPD Purge a person from the
database
Employee
Contracts
Assignment \NECoA All elements of an
assignment
Internal Address \NECoI Internal address at CERN
Grade & Step \NECoG Grade & step placement
Costing \NECoC Assignment to PPAs and
recharging centres
Secondment \NECoS Secondments to an
onization unit within
CERN
Career
Indefinite \NECaI Attribution of
Appointments indefinite appointments
Review \NECaR MOAS
Pay
Bank \NEPB Bank account
Subsistences \NEPSu Subsistences
AVS \NEPA Subscription to AVS
Staff Association \NEPSt Memberships to the staff
association
Deductions \NEPD Deductions
Insurances \NEPI Subscriptions to
Insurances
Merit Awards \NEPA Merit awards
Advances \NEPAd Advances
Loans \NEPL Bank loans
Special All \NEPSp Special Personal
Allowances
Absences
Leaves \NEAL Periods of absences
Balances \NEAB Balances
Entitlement \NEAE Annual leave entitlement
Overtime \NEO Overtime compensation
In Out
Arrival \NEIA Entitlements upon arrival
Departure \NEID Entitlements upon
departure
Reinstallation \NEIR Reinstallation
Claims
Home leave \NECH Entitlements to home
leave
Schooling \NECS Entitlements to
reimbursement of school
fees
Terminate \NET Confirmation of end of
contract for an employee
Applicant
Vacancy \NAV Vacancy
Campaign \NAC Selection committees
New \NAN Quick applicant entry
Application \NAA Application
Boards \NABo Management of selection
boards and committees
Interview \NAI Interview
Bulk
Status \NABuS Bulk status change
Referrals \NABuR Bulk referrals change
Terminate \NAT Terminate applicant
Details \NAD Person assets for
recruitment only
Positions
Description \NAPD Posts/positions
Hierarchy \NAPH Grouping of
posts/positions
UOffice
Affiliation \NUA Affiliation to institutes
Experiments \NUE Participation to
experiments
Structure
s
Organization
s
Description \NSOD New internal/external
organizations
Hierarchy \NSOH Hierarchy of
organizations
Jobs \NSJ Job Catalogue
Grades
Career Paths \NSGC Career paths
Salaries \NSGS Salaries
Experiments \NSE Definition of experiments
View
List
People \NVLP List all people
Contracts
People \NVLAP List people by assignment
Contracts \NVLAC List assignments
Organization \NVLO List employees by
organization
Element \NVLE List employees by
elements
Special \NVLS List people by special
information
Absence \NVLA List employees by
absence types
Team \NVLT List team information
Roles \NVLR List roles assignments
History
Assignment \NVHAs View employee assignment
history
Entry \NVHE View history of element
entries
Gradestep \NVHG View history of grade &
step
Costing \NVHC View history of costing
for an employee
Absence \NVHAb View history of absence
for an employee
Applicant \NVHAp View history of
applications
Positions
Employees \NVPE List employees by
position
Hierarchy \NVPH List employees by
position hierarchy
Budget \NVPB View position budget
variance
Organization \NVPO View position budget
variance by organization
Vacancies \NVV Vacancies
QuickPaint \NVQ View quick paint enquiry
Run
Reports \NRR Launch report
Outputs \NRO View report output
Letter \NRL View letter
Other
Date
Change \NODC Change session date
History \NODH View history
Profile \NOP Change personal profile
option
2.6 Navigating along the menu
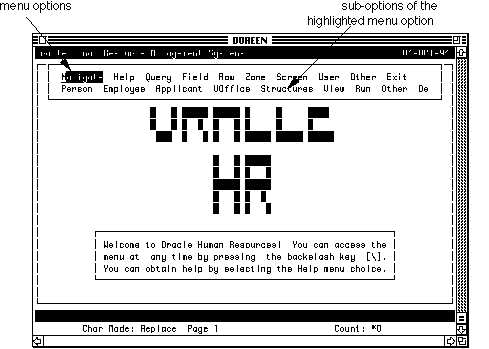
The menu can be obtained at any time by pressing on the [\ ] sign.
Navigate Utilities Help Query Field Row Zone Screen User Other
Person Employee Applicant UOffice Structures View Run Other
This documentation will be based on the lotus style menu (see above)
although you may change the appearance of the menu by setting up a new
profile with the profile option (see 'Changing Profile' ) on page 5.
You always call the main menu by pressing the backslash key (\) or PF1(for
those who have the SWISS ROMAN keyboards).
Oracle HR displays the standard menu (as seen below) at the top of your
screen in a pop-up window.
Two lines are displayed in the pop-up window: the first line is the main
menu. A menu pointer currently highlights the 'Navigate' choice and the
'Navigate' submenu appears on the second line.
You can move the menu pointer along the first line with the [ -> ] or
[<- ] arrow keys or by pressing the first letter of the menu option.
If two options start with the same letter, the menu will be reduced to
the two options. By doing this a submenu of the highlighted choice appears
on the line below it. The up arrow key(  ) will make you go up one level in the menu. By pressing the backslash
[\] sign at any time will suppress the main menu from the screen.
To select a menu choice, highlight the choice and press Return
or enter the first letter.
Main Menu
2.7 Use of function keys
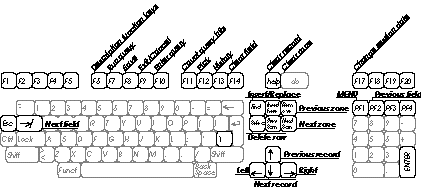
You can take all actions from the menu and you can do the equivalent by
using a single function key. In addition, most functions key have an equivalent
Escape Sequence. The following table gives the list of the functions keys,
their use, and their equivalent from the Oracle HR menu.
Action             Function      Menu          ESC key       Description
                   key           equivalent
Function keys      F1            \HK           ESC k         Obtains the list of
                                                             function keys and
                                                             their description
Execute query      F2            \QR                         Execute the query and
                                                             retrieve the records
                                                             that match the
                                                             research criteria.
Save               F3            \SS                         Saves all input
Cancel/Exit        F4            \VE           Crtl z        Cancels selected
                                                             input or exits from
                                                             the system
Enter query        F5            \QE           ESC q         Enter the research
                                                             criteria.
Count query hits   F6                          ESC e         Counts the number of
                                                             records retrieved.
Pick               F7            \FQ           ESC v         Displays a list of
                                                             pre-defined value
History            F8            \NODH         ESC h         Allows you to track
                                                             all changes that have
                                                             been made.
Clear field        F9                          ESC f         Delete information
                                                             entered in the field.
Clear row          F10           \RE           ESC c         Deletes all
                                                             information entered
                                                             in all the fields of
                                                             a zone.
Clear zone         F11           \NODC         ESC b         Deletes all
                                                             information contained
                                                             in a zone
Session date       F12                         ESC a         The Session date can
                                                             be today's date , a
                                                             past or future date.
Previous field          =        \PF           ESC tab       Access to the field
                                                             above.
Field Edit                       \FE                         Allows you to edit an
                                                             indefinite amount of
                                                             text.
Field Help                       \FH                         Gives some
                                                             information about the
                                                             current field.
Screen Help                      \SH                         Gives some
                                                             information on the
                                                             current screen.
Zone Help                        \ZH                         Gives some
                                                             information on the
                                                             current zone.
Insert/Replace                   \RI           ESC i         Allows you to insert
                                                             or replace an
                                                             information.
File creation                    \RW                         Research on who
                                                             created the last file.
Zoom                             \OZ                         Zoom to another screen
Page Up/Page Down                                            To move between the
                                                             different zones.
Macintosh Keyboard
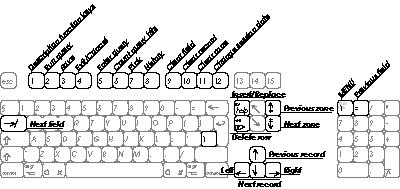
VTP keyboard
2.8 Screen composition
2.8.1 Zones and areas
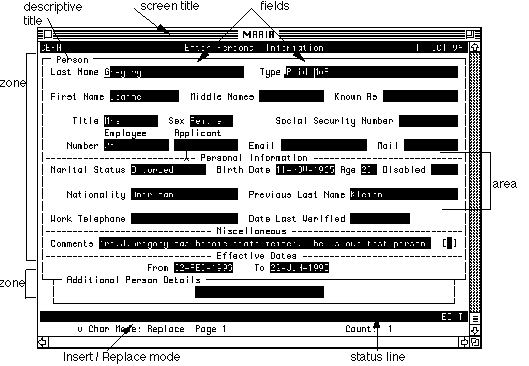
A screen is obtained by navigating through a path in the main menu. The
screen title appears at the top of the screen.
Screens are divided into zones. Each zone is surrounded by rectangular
boxes and has a descriptive title on the left.
A zone may be further divided into screen areas.
Each area is surrounded by dotted lines with the descriptive title in
the middle which contain logically related data.
Areas contain fields which are a piece of information.
Components of a screen
2.8.2 Lamps
When you tab to a field, you will notice that some messages may appear in
the status line (bottom right corner of the screens). These one-word messages
are called lamps . There are three different lamps:
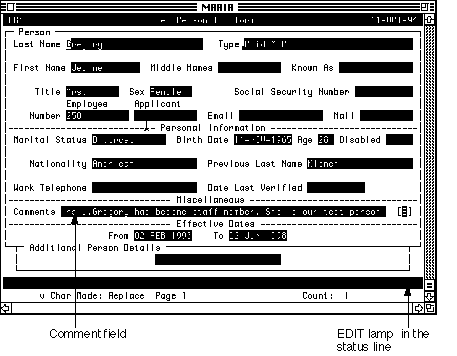
EDIT This lamp indicates that you may edit the field using field
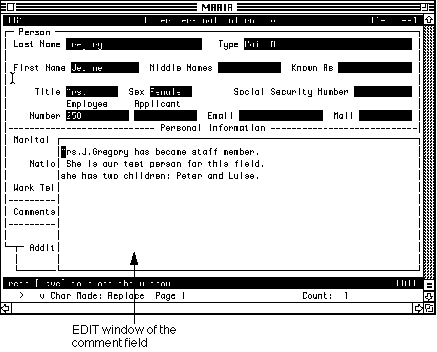
edit (\FE). Some of the fields are long fields, which means that
when you edit them, you open up an edit window which allows you to type
up to 64K of characters. An example of such a long field is the comment
field. To close the window, press SAVE (F3).
PICK This lamp indicates that you can obtain a list of values
for this field, by pressing the PICK key (F7).
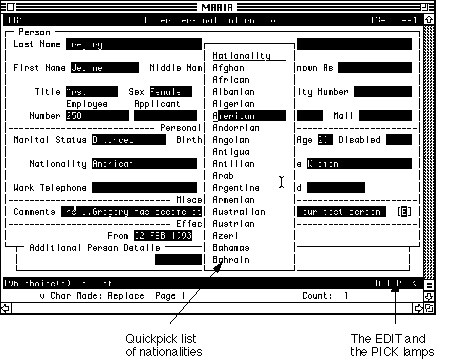
The PICK or QUICKPICK is a pop-up window which provides you with a complete
list of acceptable input choices from which you may choose. The pick is
used when you are not sure what your entry should be. To move through
the list use the Up and Down arrow keys, highlight your choice and press
return to select it. Whenever you have more than one value beginning with
the same character, enter the first letter, PICK reduces the list to those
choices starting with the character you entered. You can reduce the list
further by pressing the second character of your choice and so on until
only one choice is left.
Sometimes, a 'partial value' pop-up window appears where you have to
enter the name or partial characters of the name you are looking for.
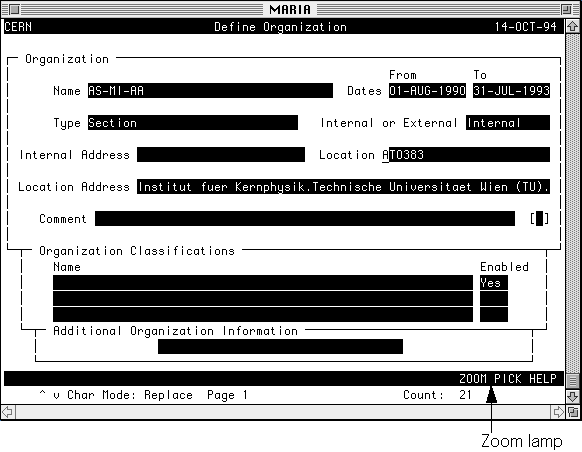
ZOOM This lamp indicates that you may zoom into another screen,
from the field your cursor is positioned on, by pressing the ZOOM key
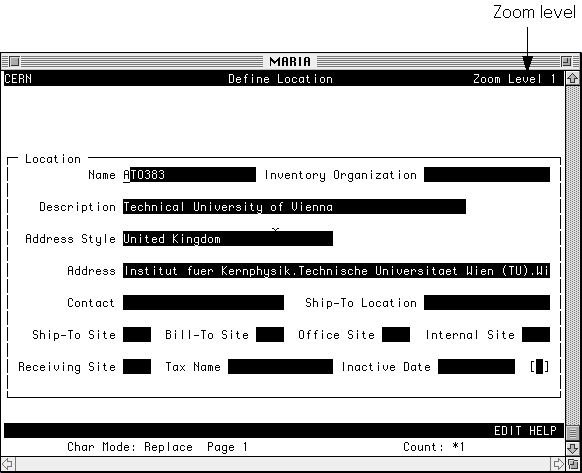
(F6 or \OZ). The zoom gives you a more detailed information about a person.
While you are in the Zoom mode the level of the zoom in which you are
is indicated in the header of the actual screen. When you quit this zoom
screen using F4, you will automatically return to the first screen.
Field Editing 1
Field Editing 2
List of values (quickpick)
Zooming from one screen to another (1)
Zooming from one screen to another (2)
2.8.3 Flexfields
Oracle HR is a standard Human Resources Management software package. It
is designed to hold standard items which most companies hold. In addition,
it is flexible enough to allow the storage and validation of any company
specific information.
Items of information which come standard in the product are called 'Base
table fields'. Other items of information which are specific to CERN
are defined as segments of a flexfield.
For example, the name, first name and birth date of a person are items
of information which are required by most companies. Thus, they are base
table fields of the table PERSON. However, the home station of a person
is not a common requirement for enterprises. This is why it has been defined
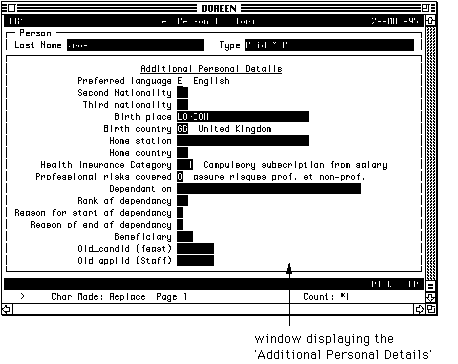
as a segment of the 'Additional Personal Details' flexfield.
The format of these flexfields, as well as the context in which they
should appear and how they are validated are defined as parameters of
the product.
Flexfields are attached to all entities defined in Oracle HR, which allows
us to add CERN specific information on persons, contracts, organizations
(Divisions/Groups/Sections), but also absences, pay elements etc.
A flexfield window displays the segments of a flexfield for entry/update
purposes and it is indicated with a [] sign. By tabbing into this field,
the user will open a window, where all the segments of the flexfield are
displayed.
Descriptive flexfield 1
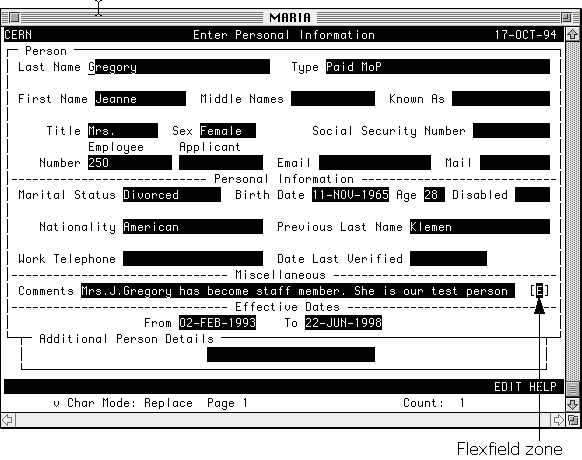
Descriptive flexfield 2
Some segments of the flexfields are context dependent. This means
that these segments will only be displayed depending on certain criteria.
For example, the start date of marriage and end date of marriage may
only qualify a relationship of type 'spouse' between two persons and are
not meaningful for a parent/child relationship.
If you do not wish to tab through all the fields of a flexfield, pressing
PREVIOUS ZONE will take you to the field before the flexfield and
NEXT ZONE will take you to the field after the flexfield.
The TAB allows you to move from one field to the next in the screen
and one can move in reverse order by pressing the function key [=].
HINT: If you want to move directly from LAST NAME to ADDITIONAL
PERSONAL DETAILS, think of using PREVIOUS FIELD.
2.9 Queries and updates
2.9.1 Queries
Oracle HR is based on a relational database. The information contained in
its repository is stored in a number of tables, which contain a number of
records. To view or modify a record in a table, this record must first be
retrieved.
There are two ways of retrieving records:
- search boxes
The majority of the screens have a search box (see section 9) which allows
you to retrieve an employee's name just by typing the name directly in
the last name field and pressing return.
- query mode
This form of query is mainly used in the\NPI screen. To enter in query
mode press F5 and enter the first letter of the name in capital
(this mode is case sensitive). When in query mode, you will see a
message displayed in the status line.
Warning: The query mode F5 is used in the Personnel Information screen
(\NPI) and in most of the define structure screens.
Entering a request
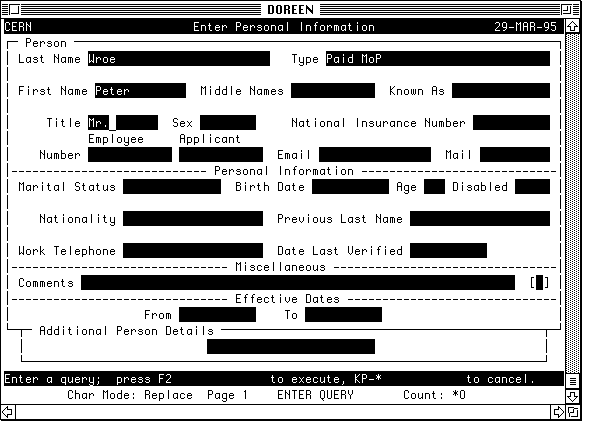
The 'Enter Query' at the bottom of the screen indicates a query mode.
When in query mode, you may enter one or more selection criteria in the
fields of the screen. Any field which is enterable in query mode may be
used as a selection criteria.
Then, by pressing Run Query (F2), you retrieve all records which
match exactly the selection criteria. A % may be used as a wild character
in these queries. To retrieve the file of Mr. Dupond, you can enter Du%
in the last name field. In this case you will retrieve Dupond but also
Durand, and any other person whose last name starts with Du.
Hint: to stop a query during its execution, press simultaneously Crtl
C
You will then get the message : ' ORACLE error occurred while trying
to perform query' or ' User requested cancel of current operation'. Then
press F10 to continue.
First record retrieved
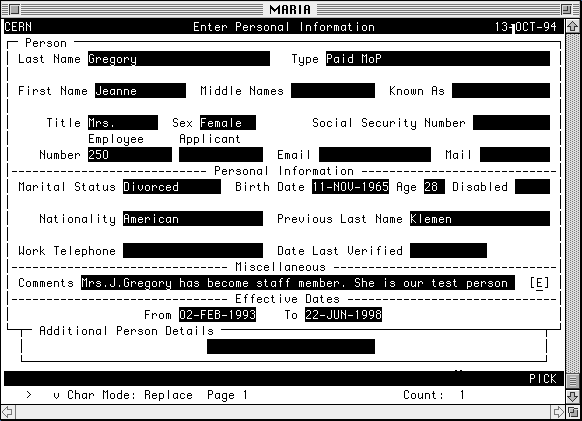
The Count indicates that we are positioned on the first record
which matches the selection criteria.
If more than one record match the selection criteria, a down arrow will
appear in the status line. You may then scroll up and down retrieved records
by pressing the Up or Down arrows.
The message COUNT at the bottom of the screen indicates that you are
positioned on the nth record which matches your selection criteria.
If a query succeeds, it automatically return to normal browse/update
mode, if no records are found which match the selection criteria, the
message 'Query returned no rows' will be issued and the screen remains
in query mode.
To find out how many records will be retrieved by the given selection
criteria, press Count Query Hits (F6). This may indicate that the
query will retrieve too many records and that it may be preferable to
enter more restrictive criteria. In this case, add some selection criteria
and try again.
The messages 'At first record' and 'At last record' indicates that the
user is positioned on the first or the last of the retrieved records.
To exit Query mode and return to browse/update mode, press Exit
(F4).
Using flexfield segments as a selection criteria:
In order to include flexfield segments in the selection criteria, the
user must tab to the flexfield stub [] and type in a % sign.
Pressing Execute Query (F2 ), will pop up the flexfield zone, where
any criteria may be entered. Pressing Next zone (or Page down ) again
will execute the query normally.
2.9.2 Updates
Once you have retrieved a record, you may modify the information which it
contains. However, the changes will not be applied and saved in the database
until you decide to do so .
This can be done in two ways:
- Press Save (F3 ) after entering the changes.
In the case when you change screen without previously saving the changes
you will get the following question:
' Do you want to commit the changes you made?'
Answer Yes (Y) .
To cancel changes to the data, the user may either press \Row Erase (F10
or ESC c or \RE), which will clear the row, or press \Screen Erase (F11
or \SE), which will clear the entire screen.
2.9.3 Delete
To delete a record, press (\RD). Oracle HR will check that coherence
and consistency of the data is preserved, and may issue a message if it
is not possible to delete the record.
The effects of (\RD) on a record are the following:
- In Personal information and in the Assignment, it causes the deletion
of the next change.
- In Special Information Type, it causes the complete deletion of the
information from the database.
- In the Pay Elements, it signals two choices either an end date to the
element or a purge.
- In Delete Person, it causes the complete deletion of the person from
the database.
To validate the deletion of the record, press Save (F3 or \SS).
2.10 To position on an employee's file
The majority of screens display a 'Search box' at the top of the screen,
which allows you to retrieve an employee's file.
Using the search box
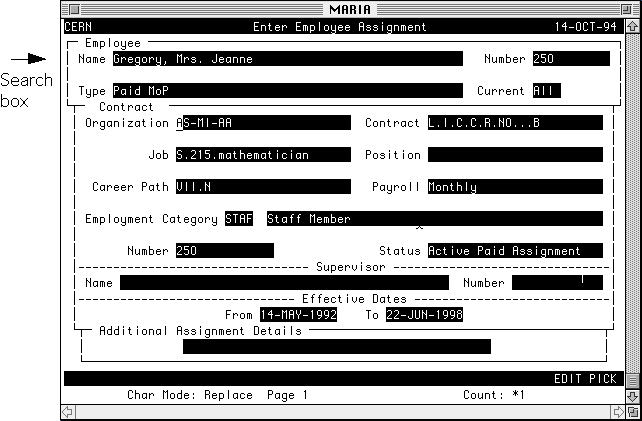
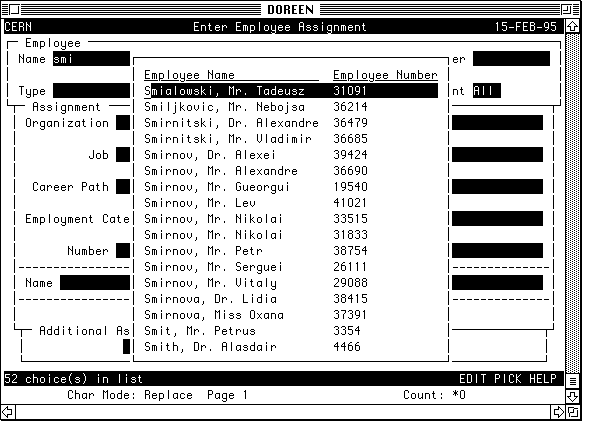
To retrieve an employee's file, you may either type the first few letters
of the employee full name or the employee number. There is no need to
enter query mode.
Once the selection criteria have been entered, press ENTER. Oracle HR
will present a list of all employees who match the selection criteria.
The user can scroll down or up to the employee he wants and press Enter
again to choose one.
The window which displays the list of persons functions exactly as a
PICK list.
Once the correct employee file has been retrieved, the information relative
to this employee will be displayed in the zones below the search box.
Once you are working on this employee, Oracle HR will systematically
retrieve the same employee on all the screens which you navigate to, until
you decide to work with another employee. This is sometimes referred to
as a sticky cursor. In this case, you must move up to the search
box again (Page Up or \ZP), clear this zone (F10, or Esc C or \RE) and
enter some other selection criteria.
Only one screen behaves differently for retrieving a person's file.
It is the 'Enter personal information' screen. The standard
Query mode/Enter criteria/Execute Query sequence must be used,
as described in section 2.9.1
2.11 Obtaining help
Help may be obtained at the level of the screen, at the level of the zone,
or at the level of the field.
By typing \SH (Screen Help) you obtain general documentation on
what the screen should be used for.
By typing \ZH (Zone Help), you obtain help on the information
contained in this particular zone.
Finally, by typing \FH (Field Help), you obtain help which focuses
on the field the cursor is on.
Help is displayed in a pop up window, which you may scroll using D (Down)
U (Up) R (Right), L (Left). You exit HELP by pressing F4 (Exit).
Oracle HR Standard Help screens
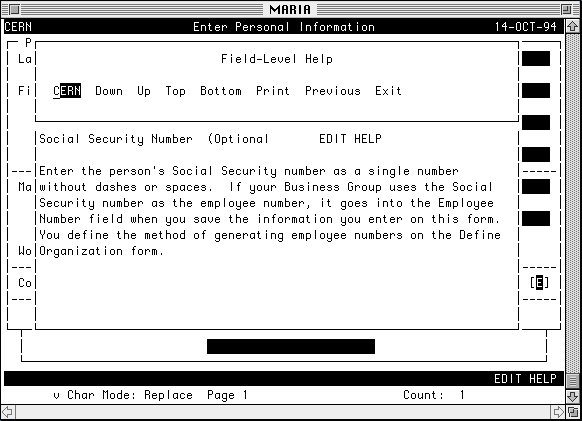
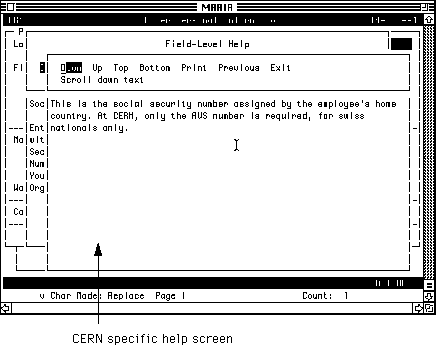
The HELP displayed is the standard Oracle HR help. To access CERN specific
help, press C (CERN). Another pop-up window will appear showing the CERN
specific Help.
Whenever you get an error message, you will be prompted with:
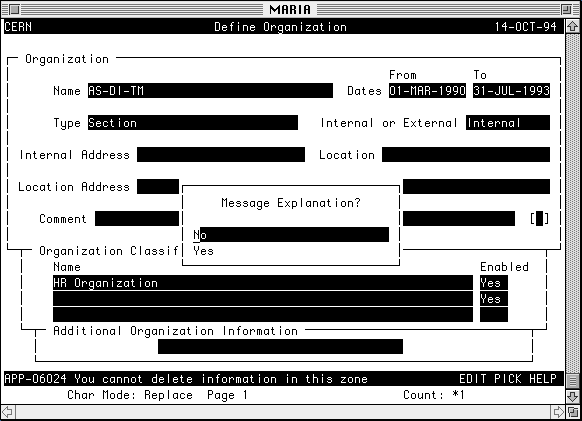
The error message will be displayed at the bottom of the screen.
By answering ' No' the message explanation will disappear .
By answering ' Yes' to this prompt you will get an explanation
of why an error was raised and a suggestion of what to do next.
HINT: when you are sufficiently familiar with the system, you
may stop this prompt to appear by changing the profile option: ' Message:
Prompt for explanation' to NO.
2.12 The time dimension in Oracle
HR
Must always respect this formatting for any dates:
DD-MMM-YYYY
The month is always in English (JAN, FEB, MAR, APR, MAI, JUN, JUL, AUG,
SEP, OCT, NOV, DEC ).
In Oracle HR, the user will find two types of information:
2.12.1 Dated information
Dated information is only valid between a start validity date and an end
validity date.
For example, an organization (this refers to a division, group or section)
such as a group within a division exists between date D1 and date D2.
Outside D1 and D2, the organization is not valid, so no reference to this
organization may be made.
For example, no employee can be assigned to this organization outside
these dates.
Tables of values belong to this category. For example, the CERN
status LABS which can no longer be assigned to an employee has a start
and end validity date, and the assignment of status LABS is not possible
outside these dates.
The screens to enter/maintain dated information, will usually show the
start and end validity dates on the top right corner.
Dated screen
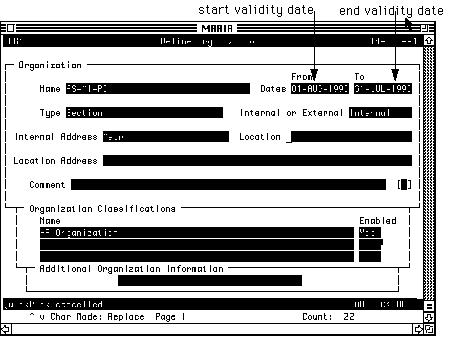
To make changes to dated information, you move the cursor to the start
and end validity dates and change them . When you enter a new record,
by default the validity start date will be set to the session date.
Note:
On Dated Screens only the current information is available.
2.12.2 Datetracked information
An information is datetracked when the user can obtain the value of this
information, at any point in time, today, or a date in the past or in the
future.
The point in time, where you want to view datetracked information from
is called the session date.
On any datetracked screen, the user will find a date, at the top right
corner of the screen, which is the session date.
When the user first logs on to Oracle HR, the session date is set to
today's date.
The user may change the session date to any date in the past or
in the future, using the ' Change session date function key' (F12)
, typing the new date and then pressing F3.
If the session date is not equal to today's date, it is prefix by DT,
which indicates the user that he is viewing datetracked information.
If your session date is different from today's date, the message
'Your current session date is 05-OCT-1994. Do you want to change it?
' will appear when you try to access another screen. This is to remind
you that you are positioned on a different session date.
All information viewed on the screen is effective as of the session date.
Datetracked screen
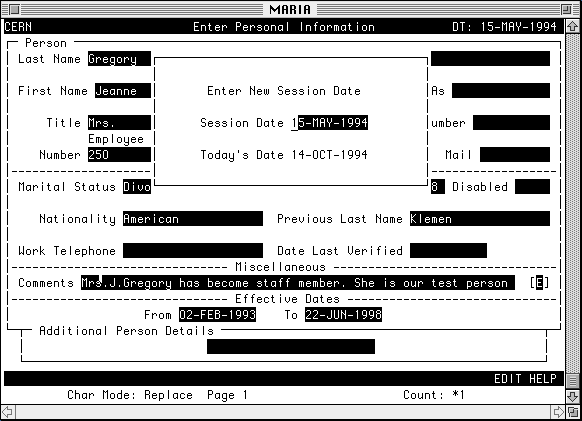
Do (F12)
Enter the date
Do (F3)
Datetracked session date
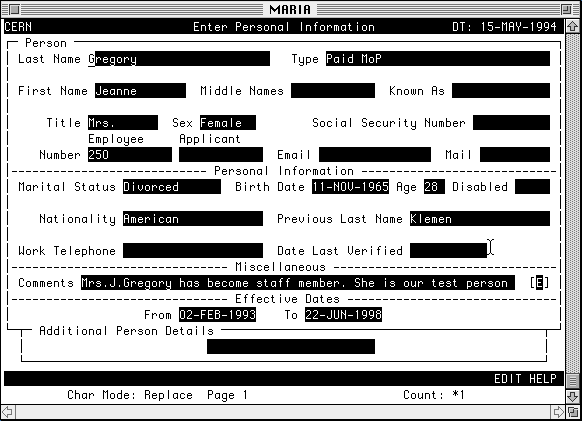
The information which is datetracked in Oracle HR is the following:
- people
- assignments (or contracts)
- costing of employee
- placement on a grade and step
- payroll element entries
Any record of information is stamped with an effective start date and
an effective end date, which appear in general in the lower half of the
screen.
Effective start and end dates
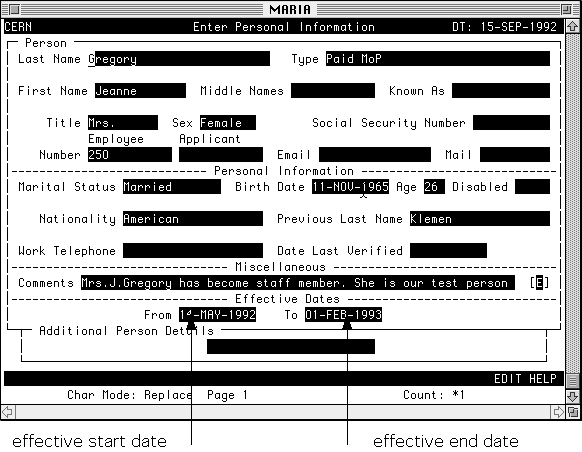
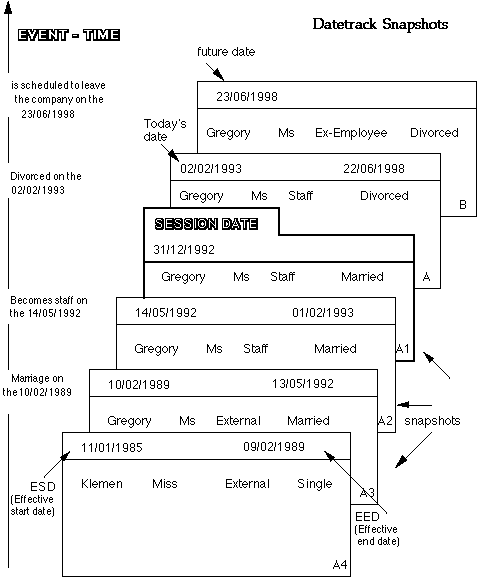
You must think of datetracked information as successive snapshots of
this information. Each snapshot being valid between the start and effective
end dates, which appear on the screen.
If the effective end date is null on the screen, you know that the
information which you are viewing is the latest known information and
that no changes have been scheduled in the future.
However, if the effective end date is not null, then the information
is only valid until the effective end date and future changes have been
scheduled.
2.12.3 Datetrack History
On any datetracked screen, you may obtain a view of all these snapshots
by using the HISTORY key (\NODH) or (F8 key).
If you want to focus on some items of information, rather than the whole
information, you have the possibility to select one or more fields, Datetrack
history will then display only the history of changes pertaining to those
selected fields.
Displaying datetracked information (I)
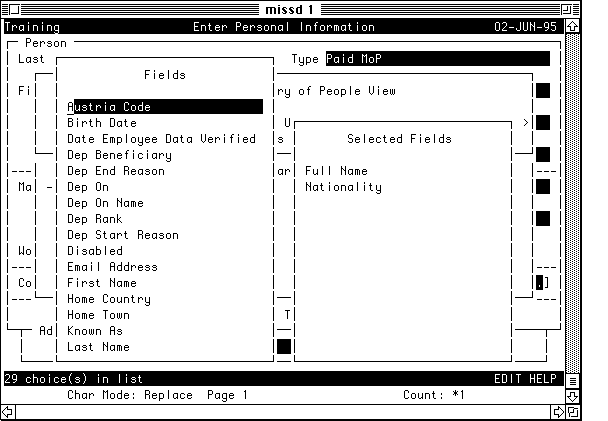
Displaying datetracked information (II)
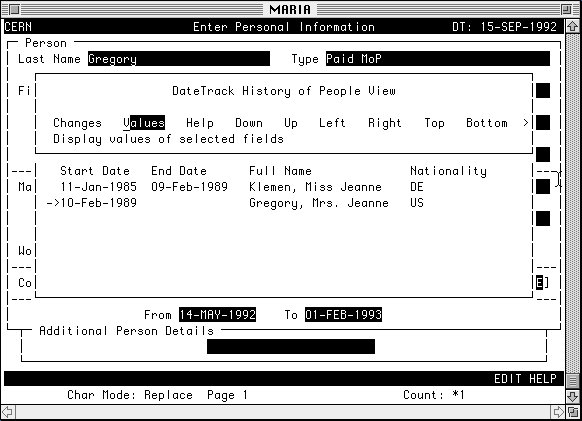
To select the fields in which changes have been made, move to the option
'Values' with the TAB key then select the fields from the list and press
return. Once all the desired fields are listed in the 'Selected Fields'
box you may press return and the details under each selected fields will
appear in the window 'Datetrack History of People View' .
2.12.3.1 To enter or update datetracked information, you must first
set the effective session date (the effective date of the change) by using
F12.
- Setting the effective date first ensures the validation and consistency
of all of the related time based information in the system.
- It also ensures that you are only presented with valid information
in QuickPick lists or in Queries.
- Finally, it allows you to make all changes which occur at a certain
date, without having to repeat the same start and end date for each item
of information.
NB: it is good practice, when you are about to make a change to
datetracked information, to view the history of this information using
the HISTORY key, and, when you have done the change, check the correctness
of the information by using the HISTORY key again.
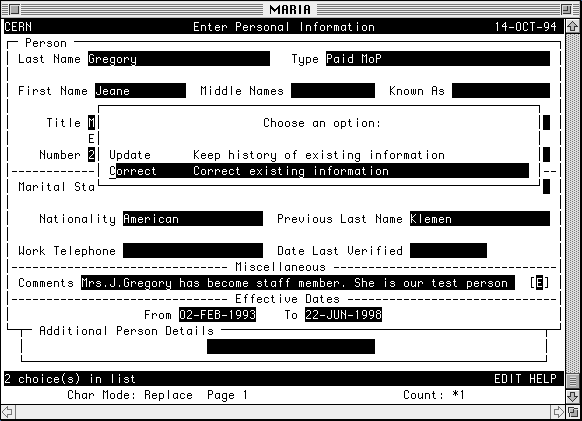
2.12.3.2 When you modify any field of a datetracked information, you
are prompted with
UPDATE Keep history of existing information
CORRECT Correct existing information
a) If you choose the UPDATE option, you decide that the system
will keep track of the change, as from that session date. A new snapshot
will be inserted, starting at the session date and ending at the date
before the start date of the next snapshot.
b) If you choose the CORRECT option, you decide to overwrite the
value of the field, for the particular snapshot you are positioned on.
Very Important:
Whatever the option you choose, the change will only effect the snapshot
of that session date. If you want to propagate the change you made over
a period of time, which encompasses several snapshots, you must apply
the same changes to all these snapshots.
If under the area 'effective dates' there is a date to not equal to null
, you must apply the same changes in the next snapshot. To do so place
yourself at the date to +1 by using F12 make the same changes and press
F3. Check the history with F8. This procedure must be applied for as long
as there is a date to != null. Apply the same rule for changes in the
past.
2.12.4 Removing Snapshots
It is possible to suppress one or more snapshots in an employee's file.
Suppose that you want to suppress a snapshot valid between dates D1 and
D2, you have to proceed as follows:
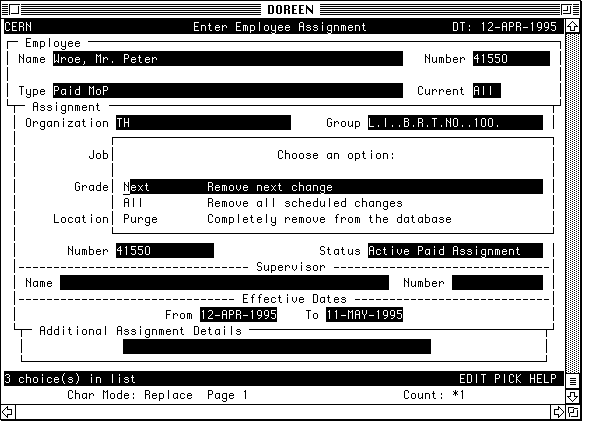
- change the session date to D1-1
- Type \RD
- the following prompt appears:
NEXT Remove next change
- if you choose NEXT then the snapshot (D1,D2) will be deleted
- press SAVE.
Removing a snapshot
|
