Information Center
The main page
When entering the Information Center of either HRT or CET, you will be presented the main page. This page gives you an outline of all the reports you currently have in your possession. I.e. you see all the reports you either created yourself or you received from other IC users. The reports are organised in a folder structure:

The main page is the central entry point allowing you to create new report, to structure them using folders, to share them with other users or to schedule them for automatic report execution (see the section describing the Report Scheduling functionality for more details). This help page describes the IC main page and explains its main features.
As shown in the above screenshot, the main page consists of two parts. On the left hand side, there is a list of folders. Folders can be used to organize reports and are especially useful if you have to deal with a large amount of reports. The main part of the window is occupied by the list of reports. The list always shows all the reports that are part of the currently selected folder.
Working with reports and folders is very similar to how the report folder for stored reports is used: Please have a look at the page describing the "Stored Reports Folder" to get a detailed description of the specific folder/report organisation features.
The tool bar and context menus
The tool bar gives you access to all the functionality available on the Information Center main page. This section briefly describes the functionality behind all currently available tool bar buttons.
Creates a new report. Clicking this button creates a new report in the currently opened folder. You are prompted to provide a name and a description. Opens the selected report in the report editor. In the report editor, you can change the definition of a report. Deletes the currently selected report or folder. Please pay attention when deleting a folder! All sub folders and reports contained by the deleted folder will also be deleted and irrecoverably lost. Displays the help pages for the Information Center (this description - you are currently reading - is part of them). Allows to rename the currently selected report or folder. Upon a click on this button, you have the possibility to change the name a report or a folder. Clones the currently selected report. Executes the currently selected report in a new window. Allows you to edit the scheduling settings for the selected report. If no scheduling settings exist so far, new settings will be automatically created. Opens a dialog that enables you to send the selected report to another Information Center user or to an entire group of users by specifying an organic unit as send target (see the report sending section for further details). Shares a folder with other users. Note that the other users get write as well as read access to all reports therein. This functionality is meant for shared maintenance of reports. It is not meant for publishing of reports to end users. Also note that subfolders are not automatically shared. All the actions that are possible by using the buttons of the toolbar are also available using the context menu which exists for the folders and the reports:
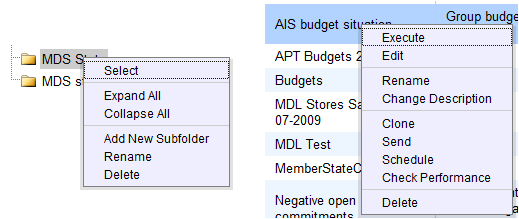
On the left, you see the context menu which is available for the folders. It corresponds exactly to the same as used inside of the Stored Reports Folder and is not further discussed here. On the right hand side, the context menu which is available for each IC report is shown. The different available options correspond to the buttons of the toolbar. In addition there are two more options:
The option "Change Description" allows you to change the description of a report and the entry "Check Performance" launches the report execution in analysis mode. I.e. that it is checked how well the report is likely to perform against the used ORACLE database. The performance check feature is offered as an indication for the report developer. A bad performance may require the addition of filters (dynamic or static conditions).
