Creating and Scheduling an Absence Info Report
About this tutorial
On this page, it will be depicted how to define an HRT Information Centre report that shows all the people that are absent on the day the report is run. Once the report has been built it will be scheduled for daily execution. After having followed this step by step tutorial, you should have a basic idea on how to define an Information Centre report and how to schedule it.
This example is only intended for people whose absences are managed by CERN (i.e. the leave requests are made via EDH) because no leave data is available for other people.
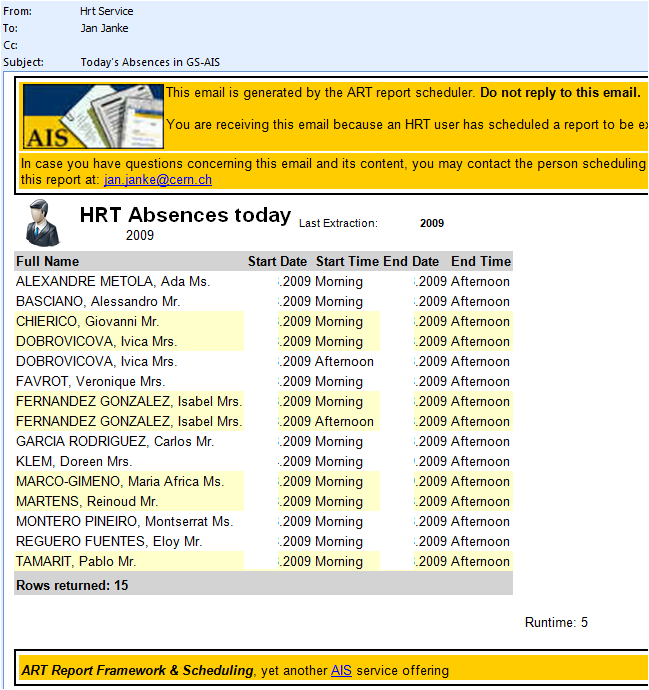
The report we are going to built may be useful to give all the members of your section or group an overview about who is expected to be absent. Everyone coming into the office in the morning will get an email listing all the people being absent. As an additional information, the complete duration of their current absence is also shown. The following screenshot shows the result of this tutorial:
At the end of all the steps presented below, such an email is sent to all members of your organic unit or to the people you specify as recipients of the scheduled absence report to be created below.
Step by step
Creating a new empty Information Centre report
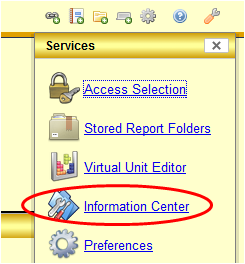
So let's start building a new report. At first go to the HRT desktop. In the services menu which is accessible via the small silver wheel in the icon bar on the upper right side of the window, you find a link to the HRT Information Center:
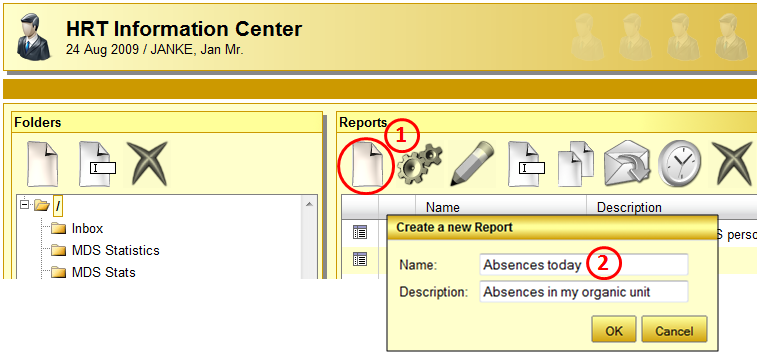
After having pressed the Information Centre link, the main page will be opened in a new window. Go to the newly opened window and choose the left most button above the report list in the button bar:
Now you have the possibility to specify a name and a description for the newly created report. Enter a meaningful name (e.g. "Absences today") and a description matching the report's actual purpose. When providing names and descriptions to Information Centre reports make sure that they always match the report's purpose and that they help you to easily discover the desired report if you have defined a lot of them. After having entered the name and the description, click the "OK" button to confirm the report's creation.
Start filling the report with data
At this point we have created a report, but it is still empty and not executable. We have not yet specified what the report should actually do. In the upcoming steps, we will open the report in edit mode, add the tables that are necessary to retrieve the absence data and specify the columns that should appear in the the report's output (i.e. in the email containing your organic unit's absences).
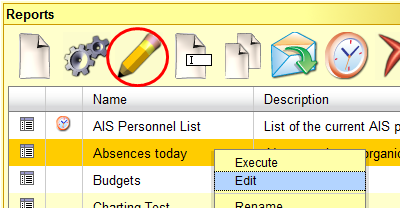
First select the newly created report on the main page by clicking at its name. Then choose the third button from the button bar at the top of the report list to open up the editor in a separate window (you can also use the entry "Edit" from the context menu which appears when right clicking your report):
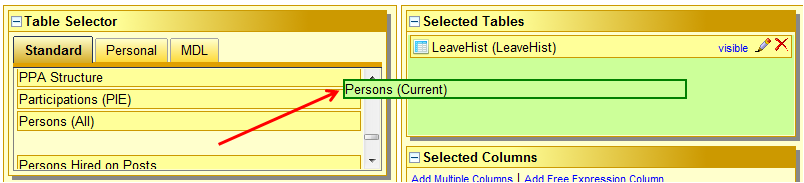
The first step in assembling the report is to find the right tables serving as sources for the data to be displayed. In this specific example we need information about people currently being at CERN and their leaves registered at CERN. In order to add tables to the report, go to the table manager and drop the tables "Leave/Absence taken" (LeaveHist) and "Persons (Current)" (Persons) to the list of selected tables:
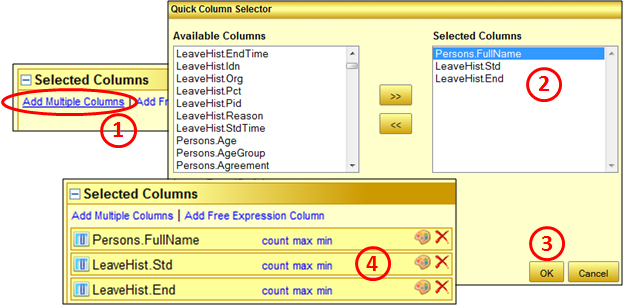
The tables are now added to the report and we can continue adding the necessary columns. We do not have to take care about how the tables are correctly joined together. This is done automatically. To add columns, click the button "Add Multiple Columns" (1) and select the following columns by moving them from the left hand side list to the right (2) and then confirming with "OK" (3).
Let's select the following columns:
- Persons.FullName - contains the full name of the person being absent
- LeaveHist.Std - contains the first day of the registered absence
- LeaveHist.End - contains the last day of the registered absence
When all the columns are selected, the list of selected columns should look as in (4) of the above screenshot.
Adding detail information by using free expression columns
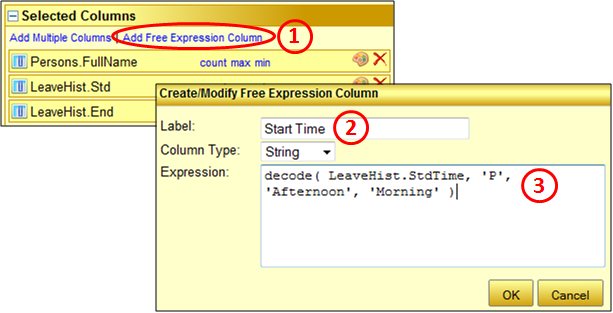
At CERN it is possible to take leaves lasting only half a day. That is the reason why our report should be able to display whether the leave starts or ends in the morning or in the afternoon. This data is contained in the column 'LeaveHist.StdTime'. We could have added the column directly but since it only contains a 'P' for afternoon and an 'A' for morning, it is preferable to provide more meaningful information to the report recipients by customising the output. To add a first free expression column, click the button 'Add Free Expression Column'.
Now a label (2) and an expression (3) need to be specified. As label, you may select 'Start Time' and the expression has to be:
decode( LeaveHist.StdTime, 'P', 'Afternoon', 'Morning' )The expression uses ORACLE's decode function which in this case looks whether the contents of the column LeaveHist.StdTime equals 'P'. If this is the case, then the 'P' is replaced by the word 'Afternoon'. Otherwise, if it doesn't equal 'P', the word 'Morning' is returned. Once you are ready, confirm your changes by clicking 'Ok'.
At the moment, the start time of the leave would not appear next to the start date. Just move the column up using drag/drop so that it appears right after the column "LeaveHist.Std".
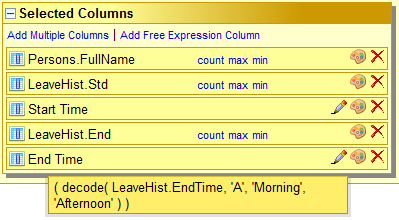
Now we will repeat the same procedure to add the end time to the report as well. To do so, please select 'Add Free Expression Column' again. Specify a label (e.g. 'End Time') and type in the following expression in the expression field:
decode( LeaveHist.EndTime, 'A', 'Morning', 'Afternoon' )As for the start date time, this expression looks if the contents of the LeaveHist.EndTime column equals 'A' and if this is true, returns the word 'Morning'. Otherwise the word 'Afternoon' will be used.
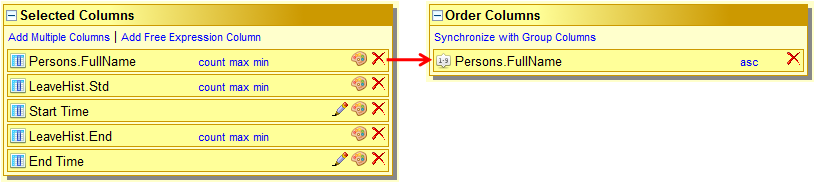
In the end, your list of selected columns should look like this:
By the way, when hovering over the free expression columns, the actual expression is shown in a tooltip as only the label is immediately visible in the list of selected columns.
Adding conditions to limit the shown absences to today and to your group
In its current form, the report is not usable because all leaves registered at CERN would be printed out (supposing you have the necessary access rights to really see all of them). Therefore at least two conditions limiting the number of results have to be applied to our report.
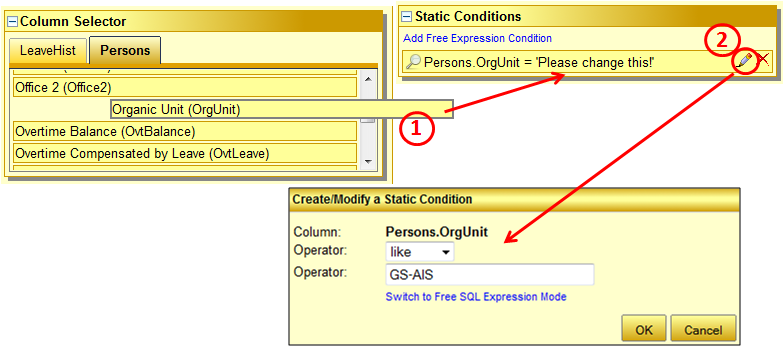
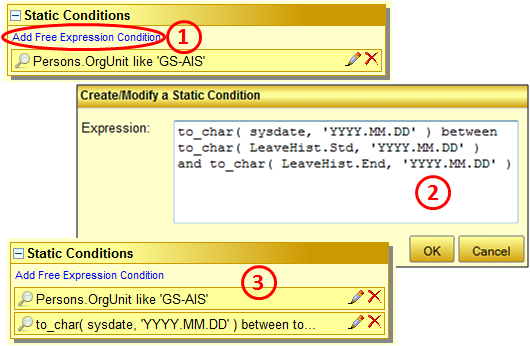
Firstly, it is necessary to specify for which organic unit we want to see the data. Therefore we have to add a static condition. To add one, drag the column "Organic Unit" from the column selector onto the list of static conditions (1). When done, we have to modify the operator and have to specify for which organic unit we want to see the leaves. This is done by pressing the pencil button (2).
We want to apply a condition to only show the data for a certain organic unit. That's why we choose the column 'Persons.OrgUnit'. As operator we select 'like' in order to also include all the people that are not directly attached to e.g. GS-AIS but also to the group's sections. Finally it is necessary to give the name of the unit we want the absence data for. In this example we are using 'GS-AIS'. Obviously, you should replace this unit by the unit you are in or responsible for. Once, you are ready, confirm the new column by pressing 'OK'.
After having specified the organic unit we want to see the leave data for, we also have to specify that only those leaves concerning people that are absent today are shown. To do so we add another static condition to the report. The condition we are going to add is a bit more sophisticated and therefore it is necessary to create the condition in free SQL mode. So, click on "Add Free Expression Condition" and enter the following condition:
to_char( sysdate, 'YYYY.MM.DD' ) between to_char( LeaveHist.Std, 'YYYY.MM.DD'  ) and
      	to_char( LeaveHist.End, 'YYYY.MM.DD'  )
This expression means that we only want to retrieve leaves if the current date (sysdate) is between the start (LeaveHist.Std) and the end date (LeaveHist.End) of the leave. All the dates are encapsulated by a 'to_char' to avoid considering the time information which is also included in the start and end dates.
When the expression is entered, confirm by clicking 'OK' again. After you have created both conditions, the list of static conditions should look like the list in (3) of the following screenshot:
Ordering the absences and saving the report
Especially when your organic unit is quite large and there may be a lot of absences in the same time, it is preferable to order the absences. In this example we decided to order them alphabetically by name. To do the same, drag the column "Persons.FullName" from the list of selected columns onto the ordering selector:
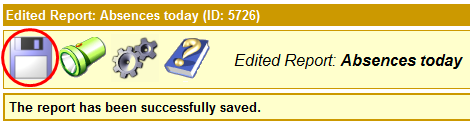
Now the report is ready. Do not forget to save it by clicking the disk icon in the button bar on the top of the report editor. When you are creating more Information Centre reports, it is advisable to save the report more often than only once it is finished. After having saved the report, you can close the report editor window.
Scheduling the report
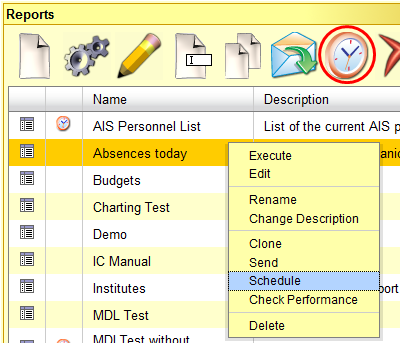
In order to schedule the absences report you have just finished creating go to the Information Centre main page and select the report by clicking on its name. Then press the 'Schedule' button out of the tool bar at the top of the main page or choose the "Schedule" entry from the context menu:
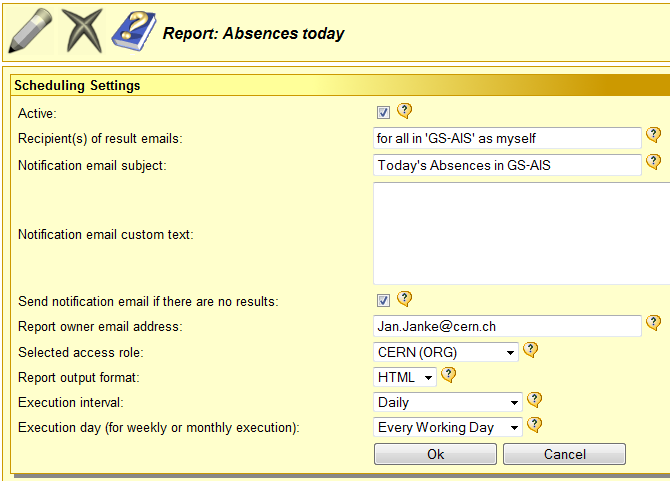
Now, the Scheduling Settings Editor is opened in a new window. You have to supply some basic settings in order to be able to activate scheduling. First of all, make sure that the settings are active by verifying that the 'Active' checkbox is checked. Then you have to provide at least one recipient email address. You can e.g. use the official mailing list where all members of your organic unit that should receive the report are entered or an expression like "for all in 'GS-AIS' as myself". In order to just test the report, we recommend that for the first couple of days you send the report only to yourself. Then when everything is fine and the report is in a good shape you can start sending it to other people.
If you want to send the report to more than one email address, separate the different email addresses by comma.
Apart from the recipient email address, all other settings are optional. You may want to specify a meaningful email subject and an additional text giving further information to the people receiving the report's results.
It is not possible to change the email address of the report owner. Your personal CERN address is automatically fetched and inserted in the settings. This email address will be used when there are any errors or other problems that make a successful report execution impossible. This address will also be included in the generated email as contact address for the recipients in case they have questions concerning the report itself or its results.
This email will not be used to send you the results of a successfully run report. So unless you include your email in the recipients list, you won't get the report's results.
When everything is done, click the 'Ok' button to save the settings and to activate the scheduling of the report. Changing the execution interval is not necessary. By default, your report is scheduled to be executed on every working day (from Monday to Friday including official holidays).