
HRT and CET Report Scheduling
Please Note! Within this document, the HRT application is used as an example, however the CET application also supports the Report Scheduling. While some features and images shown here may be specific to HRT, the basic principle of using the Report Scheduling will remain the same for the other application. |
Where to go from here
This page gives a short introduction to the report scheduling functionality available for HRT and CET. At the end of the page you find links to more in-depth step by step tutorials on how to create and schedule Information Centre reports.
The more advanced role based scheduling is explained here. Role-based scheduling allows you to have a certain scheduled report executed for all people holding a particular official role at CERN rather than specifying all recipient addresses statically.
Frequently asked questions and the corresponding answers can be found in the Report Scheduling FAQ.
What does "scheduling a report" actually mean?
The applications HRT (Human Resources Toolkit) and CET (CERN Expenditure Tracking) offer you the possibility to query data by using the provided reports. In order to use the provided reports, you first have to have the necessary access privileges and second you must go to the desired report's page, enter all the search criteria satisfying your particular information needs and launch the report by pressing on the "Retrieve" button.
When you require a certain report to be executed with the same search criteria more than once or twice, the possibility to schedule reports for an automatic unattended execution may be of interest for you. HRT and CET both offer the possibility to define a report and to have it executed automatically in self-defined regular intervals. The results of a scheduled report's run are then sent to you by email.
It is also possible to schedule a report at regular intervals and have it sent to other persons (not just you). Imagine the situation that your supervisor wants you to print out the current situation of your organic unit's budget situation every week. Instead of running the necessary CET reports manually and printing out the results, you can schedule the report and have it executed every week on Monday. As a recipient that should receive the results of the report's run, you would then specify your supervisor and possibly other persons that require the same information for their work.
Currently, it is possible to schedule HRT and/or CET reports for daily, weekly or monthly execution. The latter two options allow you to specify the exact day of the week or month when the report shall be executed. All reports that are scheduled for a certain day are usually executed in the morning after the data extractions of CET and HRT have finished. If the report was executed without problems, all persons that have been specified as recipients will receive an email with the report's results. If for some reason, the report's execution was not successful, only the report owner will receive an email.
How is the scheduling feature integrated in HRT and CET?
Scheduling a report involves two steps:
- Definition of the report that is about to be scheduled.
- Definition of the scheduling parameters.
The following sub chapters detail how to schedule a stored HRT/CET report and an Information Centre report.
Scheduling a normal application report
The following lines describe how to schedule an HRT report. The description equally applies to CET reports. There are no differences between both applications with respect to report scheduling.
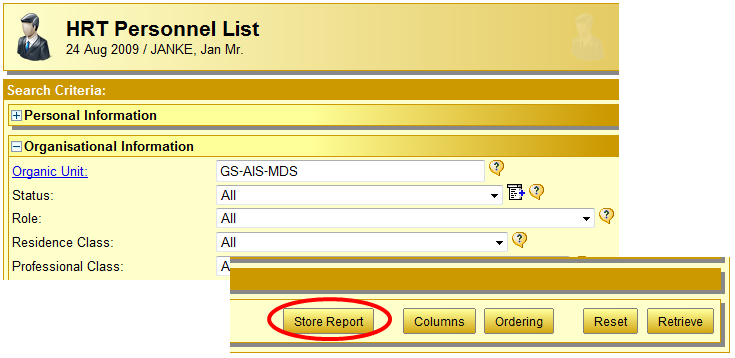
In order to schedule an HRT report, the report must have been stored in your personal report folder. To store a report open the desired report (e.g. the 'Personnel List' report), select the columns you want to see and type in all the necessary search criteria. Then instead of pressing the button 'Retrieve', you should use the button 'Store Report'.
The report folder will be opened and you have the possibility to select a specific folder to save the report in. You also have to type in a name for your stored HRT report. More about storing reports can be found here.
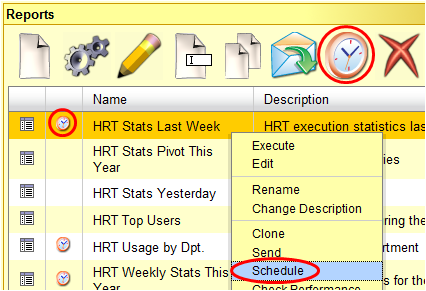
After the report has been saved it is possible to schedule it for automatic unattended execution. To open the dialog that allows you to specify the scheduling settings, select the right report by clicking on its name and then choose the 'clock' icon from the button bar on the top of the screen or use the entry "Schedule" from the context menu available when right clicking a report. A dialog will be opened in a new window.
If the report was already scheduled, a small clock icon also appears next to the report's name and you can click there to quickly access the existing scheduling settings.
Now continue to read here to get specific information on how to specify the scheduling settings.

Scheduling an Information Centre report
Scheduling an Information Centre report is very similar to scheduling stored reports. Just go to the Information Centre and select the report you want to schedule and proceed in the same way as for stored reports:
Now continue to read the following chapter to learn more about the actual scheduling settings.
Defining Scheduling Settings
Basic Scheduling Settings
Once you have decided to schedule either a stored HRT/CET or an Information Centre report and followed the procedure how to open the scheduling settings dialog (described above), you can specify the actual settings. When you have opened the scheduling settings dialog for the first time, you have to provide some base data before being able to save it. The dialog looks like the one shown below:
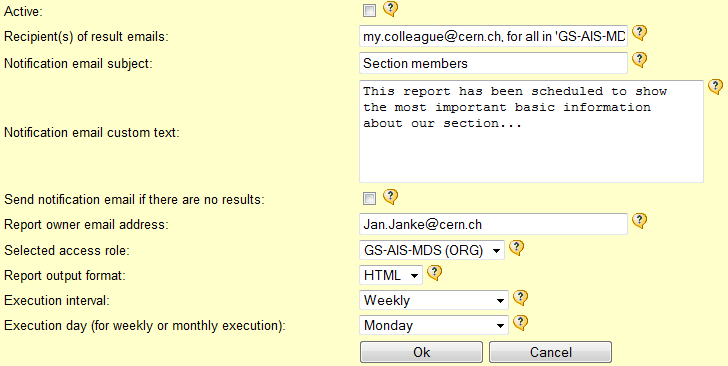
It is not possible to save the report until you have defined at least one valid recipient email address. Not only email addresses can be used, but also special "for role" or "for all in" expressions. These expressions allow determining dynamically who should receive the report results. This way, it is e.g. possible to send the email to all members of a certain organic unit or to all role holders (e.g. all SLs in your group). More information about these expressions is available here.
Optionally, you can also specify a custom subject for the report result notification email. A custom text can also be added. It would appear at the top of the generated email and may be useful to give additional information about e.g. where the data comes from, how to interpret it etc. Adding a meaningful text may help to reduce the number of questions you are getting about a report you have prepared and scheduled to be sent to a certain number of recipients.
You also find two check boxes in the 'Basic Scheduling Settings' part. The first one 'Active' allows you to specify whether your scheduled report is currently being executed automatically or not. Only reports having scheduling settings marked as being active are considered for automatic execution. Sometimes, it may nevertheless be necessary to temporarily deactivate the scheduling of a particular report without necessarily deleting the complete settings.
The second checkbox "Send notification email if there are no results" allows selecting whether all the report recipients should get an email even if there is no result in the scheduled report. By default, this option is switched off, but you are free to enable it at any time.
The email address of the report owner (i.e. you) cannot be changed. This email address is used when there is a problem with the scheduled report. In the case of problems (e.g. errors, invalid report state, execution timeouts) only the report owner will be informed about it. No emails are sent to the usual report recipients.
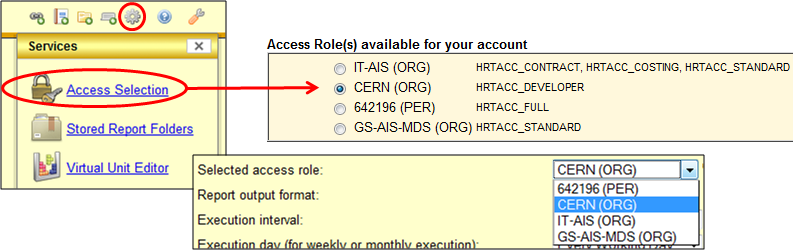
If you are scheduling an HRT Information Centre report you also have to select an access level (if you have more than one) which should be used when running the report (does not apply to CET). To do so, you can pick one of your available accesses from the dropdown box called 'Selected access role'. The available access roles correspond to the ones shown in the HRT access selection screen accessible from the HRT Desktop via the services menu. The selected access role determines which data you have access to when the scheduled report is executed.
On the bottom of the scheduling settings editing screen, you find two drop-down lists which allow you selecting when to execute your scheduled report. In the first one you can select whether your report shall be executed daily, weekly, bi-weekly (every two weeks) or monthly. The second one allows you to specify the exact day of execution if the selected interval is not daily. When having opted for the weekly or bi-weekly execution, the week days from Monday to Friday can be selected. When having chosen the monthly execution interval, the days from 1 to 31 are available. If a report is scheduled to run monthly on the 31st and the month has only 30 or even less days, the report is run on the actual last day of the month.
The unattended execution of reports is usually done on our servers once per day from Monday to Friday (except if it's an official CERN holiday). If a report that has been scheduled for monthly execution should be executed on a day that falls on a Saturday, a Sunday or another CERN holiday, it will be automatically executed on the following working day.
Once you have finished specifying the basic scheduling settings, click the 'Ok' button to save and activate the scheduling of the selected report. If you don't want to have your changes come into effect, press 'Cancel' instead. The following screenshot shows an example of a filled in basic scheduling settings dialog.
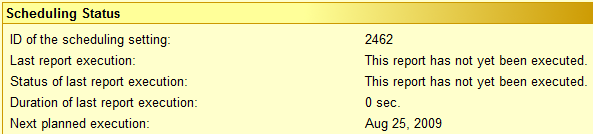
Status information display
On the bottom of the scheduling settings editor page, some status information is displayed. You can see, when the report has been run for the last time, how long it took and for which day the next execution is planned. When referring to the next working day, it is meant the next following day (regardless of whether it is an official holiday or not) that is not Saturday or Sunday.
The status of the last report execution is also shown as soon as the report has been run by the scheduler for the first time. There are several possible statuses outlined in the next paragraph.
- SUCCESS - The execution has been successful.
- TIMEOUT - The report's execution was forcefully stopped because it took too much time.
- INVALID - The report has been found to be invalid and was therefore not executed.
- ERROR - An error occurred during the report's execution.
Unless the status is 'SUCCESS', only the report owner will be notified of a failure in running a scheduled report. Normally in the case of a timeout or an invalid report, the report owner can take some action to remedy the situation (e.g. simplifying the report or adding more search criteria to restrict the length of execution). The status 'INVALID' may currently only occur if you try to run an Information Centre report that is either not executable or that contains so called 'dynamic conditions' (please have a look at the Information Centre help for further details).
Only for information purposes, the ID number of the scheduling settings for a particular report is also shown. Should you have a problem requiring you to contact the AIS Support, you should always provide us this ID so that we can easily determine the scheduling settings which are related to your potential problem.


Step by step examples
This first example explains how to create an HRT Information Centre report, that lists all the people from your group that are absent today. When the report is ready, it will be scheduled for regular automatic execution.
The second example shows how to create, store and schedule a normal CET report, that shows this year's expenditure for your organic unit (you have to have the necessary CET privileges to create such a report by yourself).